About 20% of the water used by householders is to flush their toilets. Even with water restrictions we still use an average of 342 litres of water per person per day, so that means every one of us flushes almost 70 litres of drinking quality water down the sewer every day! How much sense does that make?
We here at the Choko Tree are trying to reduce our water consumption as much as possible, while converting to sustainable water sources eg rainwater, so it seems to me that doing something about our toilet habits would be a good thing. “If it’s yellow, let it mellow; if it’s brown flush it down!” is a good credo to live by (alright, to save water by) but will only take you so far. I wanted to do better. There is also all that shocking waste of nutrients, flushed away to pollute the oceans – surely we can save water, recycle our nutrients and reduce pollution all at the same time? Let’s face it, if there wasn’t you wouldn’t be reading this article.
My initial thought was to put in a commercial system and after much searching found the Sunmar™ Excel NE. It is produced in the ‘states and is mostly plastic, plus the damn thing costs $2500 so I figured there had to be a better way. I got hold of a book from a friend called the “Humanure Handbook” which can be had for free in PDF on the net (See the links section of this site) and in it is a deceptively simple way to make a composting toilet that any remotely handy householder can do safely.
I admit that I have added a few wrinkles to his process to make it a bit more feasible for the suburban and urban dweller, but I have a friend who follows the Humanure Handbook process to the letter and it works for him.
Now the disclaimer – This information is presented for entertainment purposes only and if you try it and they come in the night to take you away, don’t come crying to us, we have enough of our own problems!
With that over with, we can get into the good stuff!
This toilet is really a collection device, it allows you to gather the output of your households bowels and bladders without upsetting yourselves or your neighbours and it starts the composting process. The process generally needs to be completed elsewhere and this will be the subject of another article (composting toilets part 2, if you will).

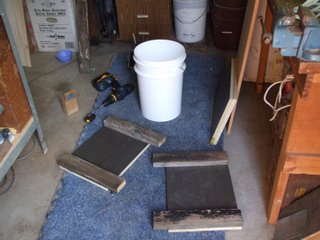
The basic principle is a bucket with a toilet seat on it, it is a bit more techo than that........but not much and OK, so I’m not a master cabinet maker – but let’s not lose sight of the fact that this is a toilet! First gather your raw materials, recycled is best. I picked up some particle board being thrown out by a local manufacturer that was 1820mm x 318mm x 20mm. I am a simple man so to make the sides I just cut it into four pieces of equal length. I have been looking around for a plastic bucket to use as the “receptacle” and according to the book you need 4. I was unable to find any that suited my purpose so (shame! shame!) I went and bought some from Bunnings. At least they are all the right size and white so you know they are clean.

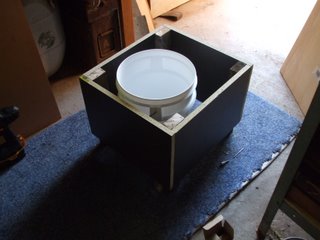
Having cut the sites I measured the bucket to get the height, allowing for 15mm or so of the bucket lip to protrude through the hole in the top of the cabinet I was making, so that the toilet seat would just make contact with the top of the bucket. To make sure the cabinet was the right size and to give me something to screw the side panels into I got hold of some of the 120mm x 36mm timber left over from making the trellis (described in another article).
I drilled and countersunk two holes in each side of the particle board then screwed the particle board to the uprights, so that the particleboard was flush with one end of the uprights, which would become the top.
I did the same on the other two and then screwed them onto the 120mm x 36mm uprights so that now we had a box, open at top and bottom and the uprights protruding below the level of the particleboard sides. The top was to be made out of plywood that I had floating around, cut to size with the circular saw (powered through an inverter by the 12 volt system, of course!).
The original design called for this to have a 75mm strip cut from one end then the rest hinged to it after it is secured to the carcase of the toilet. I decided not to do that because of the size of the box and the old wooded toilet seat I was going to use, the hinged section would interfere with the hinged toilet seat, so I just screwed it down to the top of the carcase with four screws. The idea was that when it came time to change an empty bucket for a full one, I would lift up the whole toilet and remove the bucket that way .That is the theory anyway, we’ll see how it works in practice.

I placed the top of the bucket on the plywood top and marked it out with a pencil, drilled a pilot hole then cut out the circle with my jig saw. Before fitting the toilet seat, look underneath and you will probably see some plastic cross bars that support the bit you sit on. To allow the bucket to come up under and bear on the bottom of the seat, you need to remove the inner screw and move the plastic cross bars through 90 degrees so that they are parallel with the outer edge of the toilet seat, and then reinstall the second screw to keep them in place. After that the only thing left to do is to bolt the toilet seat to the plywood top and, you’re all finished!
I still need to lacquer the top a bit but it looks reasonable now and hopefully will be functional.

I suppose at this point a bit of a discussion on how to use it would be in order. This is not the thunderbox of old, you don’t just leave your deposit and wander out. Once you have used the convenience you need to throw in some high carbon, absorbent material to balance out the carbon : nitrogen ratio, soak up liquids and prevent odour. My friend with the composting toilet used shredded paper but you could use wood shavings or sawdust, chopped hay or straw, cocopeat, dry leaves etc. Every time you use the composting toilet you must cover your deposit with dry carbonaceous material to keep your toilet operating properly.

Part two of this article will go through what to do with the full buckets, and if you’ve made it this far I’m sure you can’t wait! 


