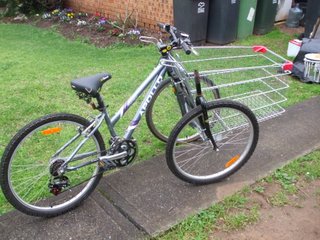
Transporting things like hay, chook pellets, bought in groceries and stuff can take a bit of effort without a car. The handcart is one option but slow, so I wanted to make one of our bikes into a tricycle for more transporting power, plus my lovely partner in sustainability is a bit unsure on a normal bike and a trike would be more stable. One way of doing this is to hybridise a bike and a shopping cart, so that is what I did, and this is how it went.
Before getting into the meaty bits I do want to point out that if you want to do this get hold of a shopping cart LEGALLY! We bought ours from a shopping cart reconditioner (and for those doubting Thomases among you, we still have the receipt) I do not want to spawn a trade in rebirthed Woolies or Coles shopping trolleys!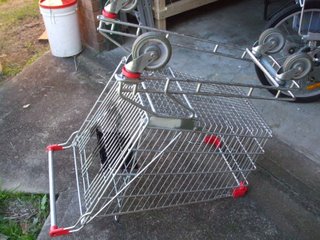
The things you will need to make the cart bike are –
A bike – We used a girls mountain bike, the girls bike being easier to get on and off, plus the cart bike is for Linda to ride.
A shopping cart – ‘nuff said!
2 x spare sets of bicycle forks, about the same size as the one on the bike.
6 x 25mm U-bolts – to hold the forks to the cart
1 x 30mm U-bold to secure the goose-neck to the cart.
First things first, I attacked the shopping cart with that most wonderful and versatile of tools, my angle grinder, with a metal cutting disk. My intention was to cut through the welds holding the wheel assembly onto the basket but on closer inspection I found that would have weakened the basket structure by removing some stiffening rods. In the end I cut through the 1cm thick chromed steel rod that formed a brace between the wheels and the basket. It was a work of minutes with the shopping cart upside down.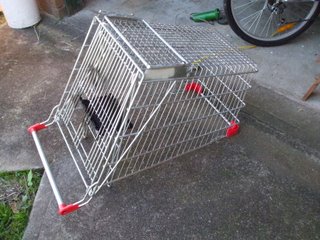
I then got hold of Linda’s bike and unbolted the front wheel, which would then become one of the wheels on the side of the cart. The two sets of forks proved remarkably difficult to find. If you were not in a hurry your could frequent garage sales, rubbish tips, your neighbours nature strips on garbage nights or your local trash and treasure markets and while I did various amounts of all of these, the required forks were not forthcoming. You really want uncomplicated forks without shock absorbers or the like, but it seems that was all bike shops had and even if they were second hand they still wanted to charge me two or three times more than I wanted to pay. In the en though I did find the Bike Barn who had two forks and only charged me one and a half times what I wanted to pay. They were good guys though and worth talking to about bikes. (see the links section)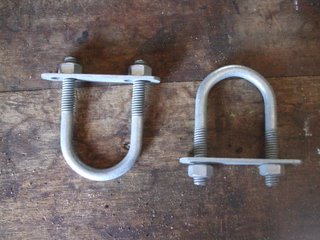
To join the forks to the cart body the recommended practice is to use U-bolts, so called because they are U shaped bolts with a steel strap across the end. The bolt goes around the forks in two places and in through the side wires of the cart and then the plate gets screwed down over the wires. There are thicker wires going horizontally around the cart and one going diagonally from the back to part way along each side. It is this diagonal one which I bolted the forks to, where it crossed two of the other horizontal thicker wires. That way the forks were being attached to doubly strong point which would hopefully put up with the strain and not get pulled out.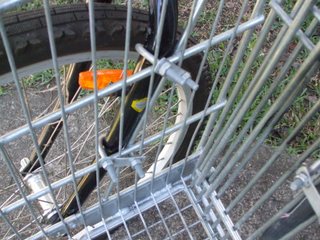
To accomplish getting the forks on I had to prop the cart up on a plastic box so that the wheels were only just touching the ground, that way I could move things about until the angle was right then tighten up the bolts. The next trick is to get the whole cart assembly attached to the front of the bike, so i brought the front of the bike (minus front wheel of course) up to the back of the cart and slid the part where the front wheel axle would normally go over the main rear structure wire running along the bottom of the cart at the back.
Once that was done I tried to get the top of the cart close enough to the handlebars and gooseneck but it didn’t want to go. I had to remove the front brake calliper assembly from the front of the fork and the cable up to the hand grip, so mow there is only the spring loaded hand grip left. Also the cart push handle was pretty much in the way but fortunately it was only held on with some plastic fittings and a bit of persuasion from my rubber hammer and it was safely removed. So now the forks could be secured to the rear of the cart with a U-bolt on each fork. There is also supposed to be a bigger U-bolt that goes around the gooseneck of the bike and gets secured to the top of the cart at the back, but i didn’t have one so tried without it – if you are going to try this, put it on.....trust me!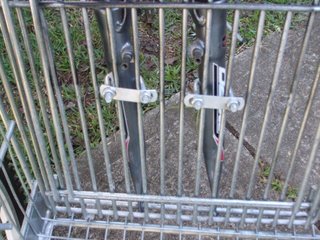
With everything more or less set up it was time for a test ride, bearing in mind that the back brake was the only on that was working. It straight ahead level flight it wasn’t too bad, but it didn’t want to turn. When I did get the cussed thing to turn it had a bad habit of the cart turning and the bike going straight ahead. This resulted in the pivot point at the handle bars heading down and the cart bike trying (successfully I might add) to buck me off! Turning the little bugger is not much fun at all, plus the U-Bolts have a most disconcerting habit of allowing the wheel and fork assembly on the side of the cart to move around, letting the wheels point at odd angles. All in all a lees than successful first ride. So...I need to –
Review the design and see if I can work out the bugs with the turning process,
• Firm up the attachment of the side forks, probably with a bit of judicious welding, and
• Get hold of the missing U-bolt and fit it.
If after all this I can’t fix it, I’ll put Linda’s bike back together and turn the cart into a bike trailer, so watch this space.....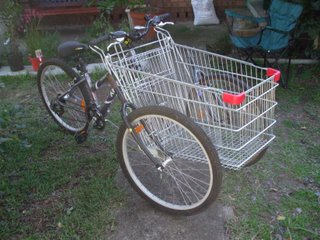
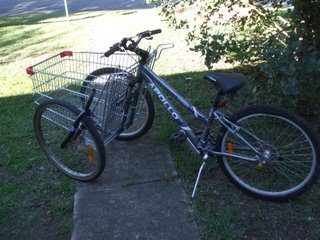
Update - September 2010
Two things have changed with the cart bike - My neighbor has offered to MIG weld the forks to the cart so I will be taking him up on his kind offer. The other thing is that I have moved the forks back toward the rear of the cart so that the forks are now attached right at the rear of the cart and this has improved stability to an amazing degree! It is easier to steer and shows much less of a tendency to tip over sideways when you make a turn. Not perfect, but considerably improved. 