


In DIY Composting Toilet Part 1 I went through how to make a new fangled thunder box out of some pineboard, a very stylish wooden toilet seat and a 20 litre bucket. It works well, is stable, comfortable and stylish (OK, maybe not stylish) but it does take up some room and is not that easy to move around. After some consideration I thought that a smaller, lighter and more manoeuvrable collection unit might be useful; particularly if it was just to be used for overnight urine collection which can then be used to feed the fruit trees or the banana circle.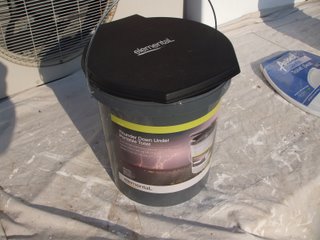
There is actually one that is commercially available and at $40 or so not horrendously expensive, we picked one up from a local camping shop – it is called of all things the “Thunder down Under” and is made by elemental. For me it is a bit low and the seat is a bit small for my......generous......posterior, but my lovely partner in the sustainable lifestyle finds it OK. If you are short on time and have some spare ready cash it is a quick fix.
But of course the other way is to make one yourself , which we will go into now –
You will need –
• A comfortable toilet seat – easiest and cheapest is if you have a spare floating around, otherwise a thin plastic jobby is fairly comfortable and can be had for under $10.
• A 20 litre bucket c/w lid – one of the second hand ones I get for $3.50 is ideal.
• A jig saw.
• Drill and twist drills.
• A pop riveter and rivets.

The production process -
1. Place the lid onto the bucket and drill a hole in the top next to the rim big enough to take the particular jig saw blade that you are using.
2. Cut out the top of the lid by running the jig saw around the edge of the lid next to the rim. You can discard the centre piece that you have cut out unless you want to use it as a Frisbee or something.
3. Grab your toilet seat and turn it upside down, then see how you go fitting the lidless rim over the hole in the seat. It probably won’t be an exact fit but see how much of the hole in the seat you can cover with the rim. I left a small gap at the front, where I can see it to prevent any nasty little surprises.
4. To join the rim to the bottom of the toilet seat I drilled three holes, one at the back and two on each side, you may want to drill more, the same size as the pop rivets that I had. 
5. I then proceeded to pop rivet the rim to the toilet seat so that the top of the rivet was on the upper face of the toilet seat, so that your tender portions are in contact with the smooth part of the rivets. The initial rivets were just long enough to make it through the seat and the rim and leave about 2-3mm to expand and make the join. This was not enough and the rim came away from the seat the first time I removed it from the bucket. Use a pop rivet with at least 6-8mm of overhang. If you want a stronger join ( you still need to be a bit gentle with it) and your set up has room, you might want to put a small steel washer on the inside of the rim to take the load.
6. Place the seat/lid rim assembly on the bucket and you are right to...umm....errr...go!
You need to be aware that with nothing in it, this does tend to tip over backwards when the toilet seat lid opens out fully so be careful and maybe put some water in it to stabilise it first. Apart from that it is reasonable comfortable, although not as stable as the original design, but cheap, easy to make and move around, and you can always take it camping!
