


Years ago I used to do most of my planting (seeds and seedlings) in the early spring, somewhere around the first week or two in September, but once I decided that I needed to produce food all year around that meant I had to plant all year around. Early on in this process I found that the Australian summer sun could cause a seedling to wither and die within a matter of hours so I needed to put a barrier between the seedlings and the sun for a while, just to give the seedling a chance. Thus I developed the sun shade idea.
How I made the Originals
I used 42mm x 19mm DAR pine, because it is easily available, light and cheap, I buy 2 metre lengths, cut one in half and make a frame 2metres by 1 metre, using lap joints and a bolt at each corner. I then put in two crosspieces 650mm or so in from each end so that the frame looks a bit like a ladder also about 250mm in from the end on the face of the frame I put in a hinge and a 300mm length of timber so that the frame now has 4 legs. To make it collapsible for easy storage I screw on a folding strut (like the type you see on card tables to keep the legs steady) from the frame to each leg. Attach 50% shade cloth over the top face of the frame using the shadecloth attachment tacks and the shade cover is completed.
Deconstructing the Old Ones

The sun shades have been working faithfully for me for over 5 years not but the two that I have are starting to look a little sad and I need another one anyway. So I decided to recycle the ones I had and extract all useable materials from them and get in enough new timber to make two and a half new ones. They cover the same area as one of my standard garden beds – about 1.2 metres by 1.8 metres, so a half size one covers 1.2 metres by 0.9 metres. I do have 3 extra long beds near the centre of the yard but by combining as standard shade with the short one I can cover the whole of it if I need to.
To deconstruct the old ones I pulled out all the bolts and screws holding it together and then removed the gang nails holding the shade cloth onto the frame. The shade cloth looked pretty much brand new even after 5 or so summers exposed to the sun so I folded it for use later. The legs holding the frame off the ground were also in good condition and the hinges that attached them to the frame were a bit rusty and bent in places but after a bit of panel beating they were ok to reuse. The timbers in the frame were mostly split, especially where I had made the lap joint in the corners, while I had done this to improve the look of the frame all I had done was to make it more complicated and detailed to produce while actually reducing the strength of the frame.
Building the New Ones
The timber that I used to build the new ones was 20mm x 40mm DAR pine because it is light, cheap and available. Sometimes you can do a good deal on pre-cut lengths if they are on “special”; I bought some 1.2 metre and 0.9 metre lengths at quite a good per metre rate, but paid normal price for the 1.8 metre lengths that I bought. Another plus was that because I was able to buy the exact lengths I needed waste was reduced and I did not need to spend time measuring and cutting (or screwing up the lengths and having to re-cut, for that matter).
To start I laid out the 1.8 metre side rails and then placed two 1.2 metre lengths at the end and two more at 60 centimetre intervals to act as braces, drilled 6mm holes through both members and bolted them together using 50mm x 6mm bolts with a washer each side. I could not use the original bolts because they were only 30mm long due to my using lap joints previously so I had to buy new ones.
Once the frame was securely bolted I attached the original shade cloth onto the top of the frame using the original gang nails. Then I turned it over to attach the recycled legs, screwing them onto the frame with Philips head screws so I could use my battery drill, much quicker and easier than a screwdriver. I butted the back of the legs up to the end piece of the frame so that it would act as a brace and provide a bit of strength to stop the legs bending back the wrong way.

To keep the legs from collapsing I needed to fit a card table stay on each leg, this allowed the legs to be folded back for storage but provided bracing when the legs were open in use. These were in place on the originals but were in such poor condition that they were unable to be recycled. I also used the Phillips head screws to attach the stays to the frame and the leg rather than the chatty little screws provided as they tend to rust and can pull out although to be fair they are probably designed for lighter duty than I needed.
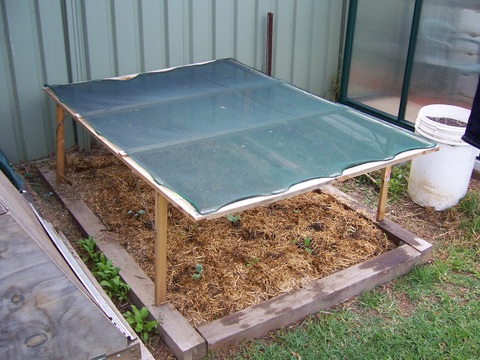
With the stays fitted, the legs can be folded under the sun shade for easy storage, always at a premium at our place, or folded out for use. So I folded the legs down and carried the sun shield over to the veggie bed planted out yesterday and put it in place. It fit well and should do an excellent job.
