A what?
A forge is a piece of equipment that combines air with a carbonaceous fuel. This achieves temperatures that get steel hot enough to go from the hard, tough material we are used to, to a soft, malleable material we are able to form into any shape we desire. Nowadays this fuel is LPG, but prior to that it was coke (the light material left after the organic materials are burned out of coal, not the black carbonated drink or the white powder some people cram up their noses) and coal; but originally it was charcoal. While charcoal does not quite contain the energy of coke or LPG it will still do the job, can be home produced and is carbon neutral so that it should be the choice of any aspiring environmental blacksmith.
Years ago a mate of mine in Canberra introduced me to the art of blacksmithing. It was a huge amount of fun and you could make all sorts of things with a bit of practice. He made his own forge based on a (small) truck brake drum and a vacuum cleaner to provide the draught of air, but he did it by running a hose from the exhaust side of his wife’s vacuum cleaner and he damn near burnt the thing out (they are not built to run for hours on end). Anyway I wanted to have a go so I built my own forge, and this is how I did it:-
The Forge
The trick with designing a charcoal burning forge is that you want enough air to be forced through the burning charcoal so that you achieve the desired blast-furnace type effect and the associated high temperature, without spraying out burning charcoal over you, the kids and the dog. What you want is the right volume of air, without so much pressure that you get a burning charcoal fountain.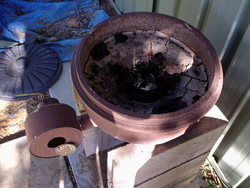
To do this we take a wide, comparatively shallow container to hold the charcoal (in our case the truck brake drum) and insert in the bottom a wide tube (called the oddly named “tuyere” which is pronounced “tweer” ) The tuyere has a removable bottom to let the ash and clinker out, and into the side of this wide tube a narrower tube is inserted to take the air from the draft source (in my mate’s case the vacuum cleaner). Originally the draft source would have been a double acting bellows, but I used an old two speed blower from a car heater.
The air is forced by the blower or whatever into the smaller tube. Once it is directed into the larger tube the volume stays the same but the pressure drops, and with a bit of fooling around you can get the draught just right – lots of heat, but no fountain!
So much for the theory
The truck brake drum that my mate used was about 300mm in diameter and about 150mm deep, with the metal being around 6mm thick. It was big enough to do the small stuff we wanted to (with a bit of modification) and you could lift it up with one hand, so it seemed a good bet for me. I was working around truckies in the chemical industry at the time so I asked a guy I knew if he had any clapped out brake drums. He said he had and was happy to give me one. He dropped it off about a week later and boy, did I get a surprise! The brake drum was 420 mm in diameter and about 160mm high but what surprised me was the thickness of the metal, the bloody thing was 15mm thick steel and weighed a ton!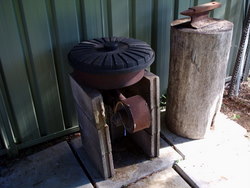
There was also a whacking great hole in the bottom where the hub was, as well as the holes for the bolts that hold the wheel on; so my first job was to put a cover over that, but leave a big enough hole to fit the tuyere in. Because it was available, I got hold of some 6mm steel plate and using an oxyacetylene torch cut a disk about 220mm in diameter to blank off the holes in the brake drum; then cut an approximately 80mm diameter hole in the centre to fit the tuyere. I then welded this plate over the bottom surface of the brake drum using a stick (or arc) welder.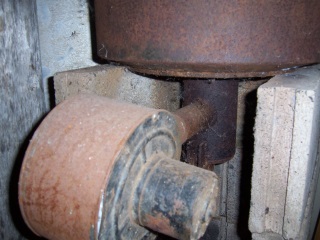
I then cut a 46mm hole in the side of the 80mm tube I was going to use as the tuyere, and welded a 180mm length of 46mm tube (that I would use to introduce the air draught into the forge) into the hole. After that it was a simple matter to weld the 80mm diameter by 190mm tuyere and side tube assembly into the 80mm hole I had cut into the bottom of the 6mm plate in the bottom of the forge. I then used the 80mm diameter blank which I had cut from the middle of the 6mm plate to make a cover for the bottom of the 80mm diameter tuyere. This meant that the air pumped in by the blower would go straight up into the bottom of the forge and not be lost out the bottom of the tuyere. I did this by welding on some lugs to the plate and the tube to form a hinge, allowing me to open the tuyere and remove ash when necessary.
To stop the charcoal from falling straight down the tuyere I cut some lengths of 10mm diameter steel rod to go over the top of the tuyere to act as a grate, then welded them in place with the arc welder. The volume of the forge is quite large and to get a good fire going I needed to put a lot of charcoal in the bottom; so to make up for this I lined the bottom of the forge with clay dug out of the backyard. This formed a funnel starting at the top edge of the forge and sloping down toward the grate in the centre of the forge body. This meant that the air draught got to more of the charcoal and made it easier to keep the fire going, while using less charcoal to fill up the forge body.
The Draught
With the forge itself now largely complete, I needed to have some method of introducing a blast of air to the burning charcoal. Classically this would have been done by huge double-acting bellows powered by the blacksmith’s apprentice, or on smaller forges a hand powered rotary fan. Seeing as I had neither, I had to design and build something else.
I wanted something that would work with the 12 volt system, so the obvious source of raw materials was a car wrecker. We had one in a nearby industrial estate and I was able to get hold of a two speed car heater fan quite cheaply. There was, however, no shroud around fan to direct the air flow in one direction, so I had to make one.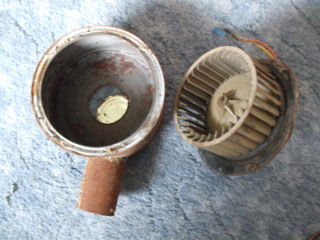
I was lucky that the original mounting flange on the fan was a reasonable fit for the opening of a 4 litre paint tin, so I got hold of a tin in reasonable condition - although some work was still needed, because a normal tin is usually 190mm high, whereas all I needed was 100mm to accommodate the fan. Using tin snips I cut the closed end off at the 100mm mark, then cut the open end off with about 20mm of the tin left on. Then mainly by hand I forced the open end into the closed end, and finally soldered the two together to make what looked like a paint tin 100mm deep.
This made the main body of the shroud, but I still needed an air inlet and outlet. Because this particular fan was a centrifugal type, the air intake would be in the flat face of the bottom of the “tin” and the outlet would need to be around the circumference. The air inlet was easy; I marked out a 50mm hole in the centre of the bottom of the tin and, with a small drill, drilled holes around the line I had drawn, allowing me to punch out the metal in the centre. I then peened over the jagged edge of the hole with a ball pein hammer to give a smooth surface that would not cause cuts. To regulate the air flow I fixed the top of a dog food can over the hole with one screw, so that it could be slid over to cover anywhere from a small part of the hole to almost all of it.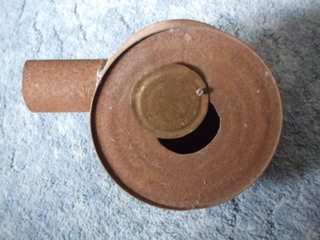
The air outlet was a bit more difficult because I needed the air to be coming out a tube slightly smaller than the steel tubing on the forge that led into the tuyere. This would allow me to just slide the narrower tube into the larger tube, then power up and have air piped in with a minimum of fuss. I rolled some thin sheet steel I had hanging around into the form of a tube, drilled and pop riveted each end to stop it coming open, then soldered along the join to make the tube stable. I made a hole in the side of the shroud using the same process I used to make the air intake hole (drill and push out), slid the pre-made tube in and then soldered it in place. That way, when I powered up the fan I got a variable blast of air coming out of the fan and straight into the tuyere.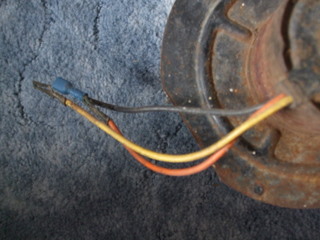
With a forge you can take waste and off-cut steel and turn it into all sorts of useful objects and hopefully if you have a mind to, this article will help you construct your own forge. An anvil is also a great help when doing a bit of blacksmithing and there is an accompanying article on this site on how to make one of those as well. Good luck and happy blacksmithing!


