Many moons ago I was over a mates place inspecting his garage and noticed that he had some clear panels installed in the roof so that about every couple of metres the roof sheeting was clear fibreglass or plastic material rather than the aluminium roof sheets. This provided heaps of light, removing the need to have lights on in the garage during the day if he was working, this impressed me and I made comments to the effect it was a terrific idea. He made a somewhat long face and said “yeah, but the garage gets too hot to work in during summer!”.
My garage is a decent size and tends to be a bit dark up the front and now that we have a carport at the front the problem has gotten worse, so I needed to work out what to do about it. While tooling around the net one day I found a clip on u-tube showing how to use a plastic drink bottle as a skylight and decided that it looked pretty good to me. All I needed was a PET drink bottle, some roofing material the same profile as the roof of the garage, some silicon sealant and a few pop rivets, which as luck would have it I had hanging around. This is how I did it –
Hmm, one thing before we get into the fun bits, while it is not absolutely necessary, it does help if you have a nibbler (that is to say the tool, not the little alien critter on Futurama). A nibbler allows you to turn your electric drill into a tool that cuts through sheet metal like a hot knife through butter, although it does spit out little half-moon shaped bits of metal that I would hate to get in my eye, so wear safety glasses unless you are using it over head in which case I would opt for goggles and it is also as noisy as buggery so a pair of ear muffs would not go astray either.
1. A mate had dropped off some spare roof sheeting he had, so using the nibbler I cut off a roughly 30cm square lump that took into account two raised bits and one flat bit in the middle. (if you can’t understand all this technical jargon, look at the photos).
2. Using a pair of callipers I measured the diameter of the bottle, halved it to get the radius then drew out a circle in the middle of the flat bit the same size as the bottle. I drilled a small 1/8 inch hole in the dead centre of the circle as a pilot hole then drilled 3/8 inch hole to allow me to cut from the centre out to the circumference of the circle.
3. The first “cut” I made was with the nibbler but it took out a 3-4mm swath through the metal so I decided to make the rest of the cuts with a pair of tin snips, and if you have offset tinsnips you will find the job easier. 
4. I used the tinsnips to make a series of radial cuts from the centre hole out to the circumference of the circle so that the metal now looks like a pie cut into a whole stack of wedges. Once the cutting has been completed (or even before) you might like to find a pair of thick leather gloves, the sides of the metal slices are razor sharp and you can do serious damage without much effort!
5. With glove wrapped hands I grabbed a set of good solid pliers and proceeded to bend the slices up and outward so that eventually I had a series of jagged teeth standing straight up and at a right angle to the hole and the surface of the metal.")
6. I could then do a test fitting of the empty bottle in the hole, and as luck would have it the hole was a little small so I had to spend some time with the tin snips and pliers moving each of the teeth back a bit to enlarge the hole. The trick is to check with the bottle regularly and not get carried away; you want the bottle to only just fit through otherwise it will take a lot more effort (and sealant) to keep the rain out.
7. After a bit of work the bottle fitted well. At this point I filled the bottle with clean tap water and bunged in a tablespoon of bleach to stop the water going green, I left at about 12mm of freeboard in the bottle to allow for the water to expand. The full and tightly capped bottle is easier to manoeuvre and seal into the metal.
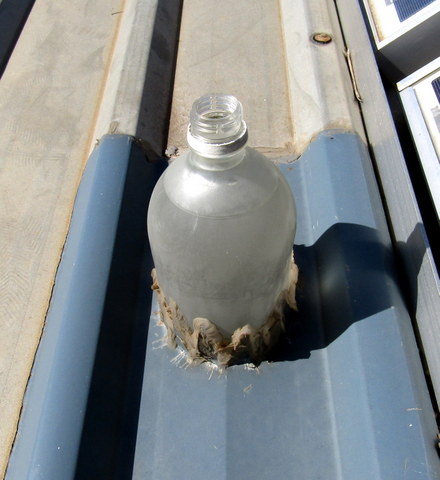
8. With the bottle now full, I set it up with timber blocks so that the roofing metal sat about half way up the bottle, and I then put a stack of silicone sealant around each of the metal “teeth” (Repeat after me:”silicone is my friend”) and smoothed it out to ensure it formed a seal. Once it was set enough to hold I also ran a small bead around the bottom where the bottle protruded through the roofing metal to complete the seal.
9. I left it a few days to make sure the silicone had set and then proceeded to set it into the roof of the garage. I measured the bottle up and set the callipers to the radius of the bottle then used the callipers to scribe a circle on the top surface of the garage roof, drilled a 3/8 inch hole and then put the nibbler in and cut out a bottle-sized hole in the roof. This was a pretty big moment because I knew that if I screwed it up I would get a garage full of water next time it rained (Repeat after me:”silicone is my friend”).
10. Fortunately the bottle and roofing fit very well when I did a test fitting so I cleaned the metal surfaces with metho and applied a liberal amount of sealant to the roof, put the bottle and roofing square in place then put in a couple of pop rivets at each end to hold it in place. 
11. I then ran a bead of silicone around the edge of the roofing square and the last finishing touch was to go back inside the garage and run a bead of silicone around where the bottle protruded down through the roof to form a final water tight seal.
I have to say that this works remarkably well! It provides enough light to work by with the garage door down, even at 5:30 in the afternoon. As soon as there is direct sunlight hitting the top of the bottle, there is light in the garage. I have seen it compared to a 50 watt bulb and to me seems to provide at least that much light.
If you have a single skin roof and an area where you want light during the day you too can create one of these little masterpieces, probably out of stuff that you have hanging around, so give it a go! It has worked so well that I am thinking about making a few more to give more light in the garage and even light up a couple of our sheds!")
2019 Update
Seven years along and the light is still working. The top has gone a little milky, and I found that the screw cap had become brittle to the point of falling off so that I had to replace it, but the amount of light provided does not seem to have diminished at all.