


Thirty years ago and old friend of mine by the name of Bill Tarplee was operating a magazine out of Canberra and he wrote a series of articles on buying, doing up and looking after hand tools. Bill was a manual arts teacher at one stage, very skilful with his hands and knows all that there is to know about hand tools (among other things). I have been lucky enough to secure his permission to republish some of his original articles and here is the first.
Please note that the photos for this article were taken of my plane collection which is not as high a quality or as extensive as Bill’s (except the first one which I got from Uncle Wikipedia).
The Parts of a Plane
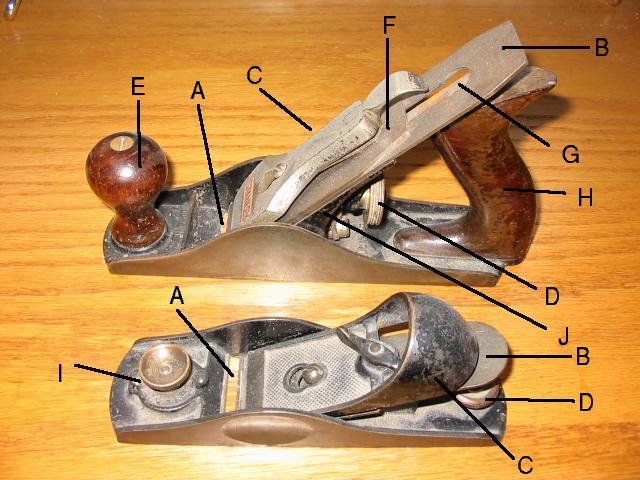
Two styles of plane are shown with some parts labeled. The top of the image is a bench plane; the bottom is a block plane.
A: The mouth is an opening in the bottom of the plane down through which the blade extends, and up through which wood shavings pass.
B: The iron is a plate of steel with a sharpened edge which cuts the wood. Some people refer to it as the blade.
C: The lever cap holds the blade down firmly to the body of the plane.
D: The depth adjustment knob controls how far the blade extends through the mouth.
E: The knob is a handle on the front of the plane.
F: The chipbreaker or Cap iron serves to make the blade more rigid and to curl and break apart wood shavings as they pass through the mouth.
G: The lateral adjustment lever is used to adjust the iron by skewing it so that the depth of cut is uniform across the mouth.
H: The handle on the rear of the plane.
I: The finger rest knob Block planes are held in the palm of the hand while the tip of the user's index finger rests in the indentation on top of the knob. On some planes the knob is used to adjust the size of the mouth by allowing a sliding portion of the sole to be moved back or forward to accomplish this.
J: The frog is a sliding iron wedge that holds the plane iron at the proper angle. It slides to adjust the gap between the cutting edge and the front of the mouth. The frog is screwed down to the inside of the sole through two parallel slots and on many planes is only adjustable with a screwdriver when the plane iron is removed.
Metal Planes
It has long been my opinion that you can never have too many hand tools. While one can perform a multitude of tasks with a limited number of tools, I prefer to have specific tools for particular tasks. I buy planes when the opportunity presents itself and I suggest you do the same. Never be afraid of buying second hand tools, if the article looks clean, does not have any damage or missing parts, and the price is right then you have little to risk.
Local trash ‘n treasure markets, auctions, deceased estates, school fetes – all are opportunities to buy planes and other tools. If you have the chance to buy a metal body plane that is missing parts it pays to remember that plane irons (blades) and handles are regarded as consumable items and can be found in hardware stores. I do not know whether you could buy a replacement back iron or a new frog so look at the tool with that in mind.

If you buy second hand tools, take the time to clean them up before you start using them. With my planes I like completely dismantle them and thoroughly clean all parts. Put a light smear of grease on all threads before reassembly, grease under the frog to prevent rust forming.
When adjusting the frog, (and I am presupposing here that you have just cleaned the tool up and that every part is rust free) you will find that there are two securing screws that pass through the frog into the body of the plane. At the back of the frog, beneath the blade adjustment screw is the frog adjustment screw. Just nip up the two securing screws lightly, fit the blade and cap iron, and move the adjustment screw until you have a gap of about 2mm maximum between the front of the blade and the mouth. Remove the cap iron and blade and tighten the securing screws.
The screw through the lever cap should be just tight enough that there is firm pressure when the lever cap is depressed. Note that the lateral adjustment lever usually lies to one side when the blade is properly centralised (some seem to think that the lever must be central on the plane).
Metal planes were sometimes referred to by number, number 4 is a smoothing plane; number 5 is a jack plane, a foreplane is number 6 and a trying plane is no7.
Wooden Planes
Many look upon the old wooden planes as something that is best suited as an ornament, given my preference I would far prefer to use a wooden plane than a metal one. Unless there is something wrong with the sole, a wooden plane is always easier to push, and I think that it does a better job.
Unfortunately all planes need frequent sharpening and therein lies the reason for the metal planes popularity, they are easier and quicker to disassemble and reassemble as well as being easier for the novice to adjust, since the blade depth is controlled with a screw rather than by tapping with a hammer. There were quite a number of wooden soled planes available in the past, at that time the tradesmen sought out the best of both types and got it. If you ever get the opportunity I would suggest you buy any examples of these hybrids (wood sole and metal upper) as they are a delight to use.
If you get the chance, don’t pass up full wooden planes either, once you know the ways of them they will soon become your favourite. However, before you start throwing good money around, make some basic checks. Make sure there are no cracks or splits in the body of the plane; wooden planes were usually made from English beech, it is a hard and stable timber, not given to splitting when correctly seasoned. Make sure there are no parts missing, if the plane is in epics there should be a body, a blade, a cap iron and a wooden wedge. You can expect that the wedge will be gapped and chipped at the top and it is likely that the top of the blade will be showing the effects of hammer blows, neither is usually any great problem.
To take the blade out, hold the plane body in one hand and strike the rear end of the plane with a wooden mallet. Doubtless there will be many marks at the end where various clowns have used hammers, either not knowing or not caring to use the correct tool. Some of the jack planes (and larger) came with a wooden button at the front of the plane. This was not a handle that had broken off, but a striking pad for knocking the blade out. While you can hit the button (that is the toe of the plane) I prefer to strike the heel.
With the plane disassembled, start a cleanup of the parts. Frequently you will need to scrape away encrusted dirt from the sides and top of the plane. Once that is done I like to use a piece of coarse steel wool and a few drops of raw linseed oil. The steel wool cuts away the grime and a measure of surface wood and the linseed oil will penetrate the wood and form a protective skin or varnish. Once you have cleaned up all the wooden parts, including the handle and wedge, and cleaned down in the throat wipe off all the excess oil and steel. Allow the oil to penetrate for a few days and oil again, using very sparing coats.
Clean up the plane iron and the back iron using emery cloth and kerosene if necessary. Grind off any distorted metal at the top of the back iron. Sharpen the blade and wait until the oil is dry on the wooden parts. To assemble the plane, fit the blade so that it ALMOST penetrates the sole and slip in the wedge, then push the wedge in hard with your hand. With very light taps of the hammer, drive the wedge down until it is deep enough, then knock the wedge with a mallet. If you have gone too far and the blade is too far out, a li9ght tap on the heel will loosen the wedge and you can start again. Lateral adjustment is made by knocking the blade sideways with a hammer. You will find that it really is quite easy and precise.
Before we look at the next category, there is one final point that I would like to cover. On average you will find that the width of a board planed is lees than the width of the sole of the plane. From observation I would guess that the average board is about 40 odd mm wide. That is the width of the worn area on the sole of the average wooden plane.
It was always understood that a tradesmen would resurface the sole of a plane as and when necessary. This was done by sharpening and honing the blade of a long plane (maybe a Try plane or Jointing plane) to a razor edge, setting it very fine, and carefully removing fine shavings until the worn area was cut away. The new surface was then either waxed or oiled with linseed oil. If you want to obtain a true surface, i.e. one that is flat and straight, use the longest plane you have. A long plane will only cut off the high spots – same principle as a road grader – they don’t make them that long for fun!
Block Planes
In keeping with wooden planes, the block planes are adjusted with a hammer; normally there is a small button on the heel for striking with a mallet. Lateral adjustment is with a hammer but as I said before, it is very accurate once you are used to the method.
Unlike most planes the block plane has no cap iron and interestingly the blade goes in “upside down”. Normally the blade is fitted with the grinding facet to the sole of the plane but in the case of a block plane the grinding facet faces up. A cap iron is usually fitted to “break” the shaving and stop the wood from tearing or splitting away in front of the blade. The block plane got around these problems by lowering the angle of the blade and making a handle from what would normally be the lever cap iron. Anyway, even if you don’t understand the principles, they are a good plane to have. (They are also good for starting your offspring off on the timber butchery trail – they fit the small hand better than most other planes).
An article on Special Purpose Planes is available.
