Back in the day when we sharpened wood saws rather than buying a cheapie and tossing it out when it become blunt, you used to be able to buy a device called a saw clamp to keep your saw steady while you went about sharpening it. Unfortunately I haven’t seen one for sale for many years, even second hand and I’m not sure that most people would know what it was if they saw it!
However, being able to keep your saws sharp makes your working with wood easier and much more enjoyable as well as extending the life of your saws by many years (thus saving lots of money) so it is a worthwhile skill to learn. Also, having a piece of kit that makes the job easier by keeping the saw held firmly but with the teeth still accessible is a good thing to have too and this article will show you how to make one for the cost of a hinge and some screws.
The timber that I used was straight off a hardwood pallet; it is amazing how well they come up after planing the top, rough layer off!
To make the saw sharpening vise you will need the following timber
a) 2 pieces 200mm x 93mm x 20mm
b) 2 pieces 100mm x 93mm x 20mm
c) 2 pieces 280mm x 65mm x 20mm
Really, the width and thickness can be pretty much whatever you’ve got so long as the rough shape is the same, these sizes worked for me and are designed around what I got off the pallet and I was able to get all the bits from one of the 1200mm boards off the pallet.
After pulling the board off the pallet and removing the nails, it was a comparatively simple matter to plane off the rough outer surface of the wood to give a nice finish and I used my faithful jack plane to do the work.
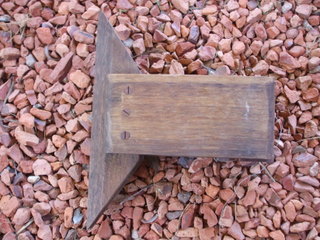
Then it was an easy matter to use my crosscut saw to cut the board into the various lengths, I then glued one each of piece b) to the end of each piece a) so that the board was double thickness at one end and single thickness at the other. Using a wood rasp and some fine sandpaper I rounded off the outside ends of the longer board to make it look pretty.
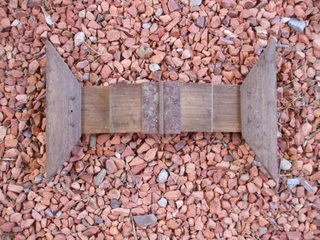
I then took the third set of pieces (c) and cut the long axis down from the standard 93mm wide to 65mm wide. These were to be the jaws of the vise that would hold the saw steady while it was sharpened and so would need to be cut to shape. They are tapered at each end; I measured off the centre of the board’s long axis and then measured in 50mm each side of the centre line and then drew a diagonal line to the opposite corner. Cutting along each of these lines gave me a piece of wood shaped like a long narrow trapezium.
On the long axis or base of the trapezium I measured 30mm down along side and 10mm in along the edge and drew lines along to help me keep straight, then planed away the material inside the line to give a chamfered edge. This was to be the outside surface of the jaws. The inside surface of the jaws I needed to taper from the short side of the trapezium up to the long side of the trapezium such that there was a thin surface of wood to grip the saw blade, so I pared it down with my faithful jack plane. This was a lot easier and more fun to actually do than it sounds when I describe it!
Once this is done the vise can be assembled. I got a large, economy sized hinge and screwed each side to the thickened end of the part a/b assembly using screws that were long enough to go though into both pieces. If you are concerned about the wood splitting, pre drill the holes first with a drill small enough to allow the screw threads plenty of bite. I then screwed the jaws to the other end of the assembly. (I tried to describe how I did it detail and realised it made no sense at all, so look at the photos...)
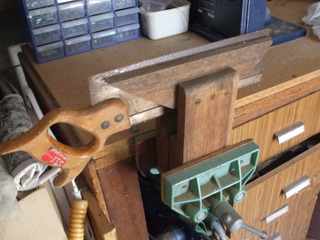
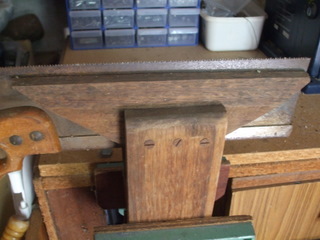
To use the vise, put the saw in so that the teeth come up just above the jaws and then place the whole thing into a wood workers vise and tighten it up on the saw vise. It will hold your saw nice and steady while file the teeth sharp.


