


The idea of cooking with stored heat has been around since medieval times, when they used to place their pre-heated cooking pots in a nest of hay, stray or dry leaves etc in a box or hole in the ground to finish cooking, thereby maximising fuel use. This practice continued in various guises and places up until the early part of the 20th century when, with advent of cheap electricity, we seemed to have forgotten about it. Hay box cookers, as they are sometimes called, did enjoy a revival in the late 70s to early 80s when the fuel crisis set in and you can find instructions on how to make them in the self sufficient living books of the time. Instructions on how I made my two can be found here and here. They are a great tool to help you live more sustainably so maybe there should be a revival of the haybox again now!
Why bother?
- As discussed above, you can save fuel used to cook you dinner from between 20% and 80% depending on the recipe and how long it would normally cook for, the longer the cooking required, the more you save.
- In line with saving fuel, unless you live on a bush block and only burn wood whatever fuel; you use you will have to pay for so you can also save money.
- Reduced fuel usage (gas or electricity) means reduction in greenhouse gas production as well so you are saving the environment too.
- Longer cooking at lower temperature means that you maximise nutrients and flavour in the food you are cooking.
- I don’t know about you, but I get nervous about leaving appliances on while I am not home, so you can put you dinner on before you leave for work, as you would with a slow cooker, but with no external energy input you won’t come home to a pile of smoking wreckage!
- They are cheap, easy and lots of fun to build
- They can sit in the stored heat cooker forever and not get burned or overcooked.
- While they are ideal for winter soups and stews they will also reduce heat input into the kitchen in summer
- Surprise your friends & amaze family, they turn up expecting a feed and find nothing on the stove, after a few minutes worried conversation you can yell “Ta Daaaaaaaa!” and pull a fully cooked meal out of the stored heat cooker. (Yes, I do have a perverse sense of humour)
The Components
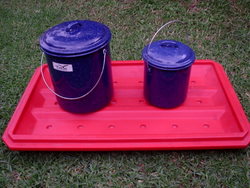
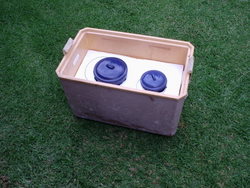
To build a stored heat cooker you need to have three basics; an outer container, insulation material of some description and the inner cooking pot.
The Outer Container
The outer container can be a Styrofoam Esky or recycled broccoli box, an old trunk, wooden box or barrel, in fact any container that is large enough to hold the pot and insulation and is airtight. Wooden boxes or barrels with cracks between the slats or staves will need to be lined with cardboard or aluminium foil to ensure they are airtight. If the material of the box is also a good insulator such as Styrofoam, so much the better. The outer container can also be made from fabric as the Wonderbox is, but more on that later.
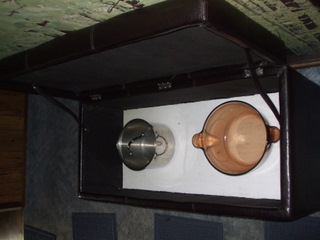
One thing I have found is that if the outer container resembles a nice piece of furniture such as an ottoman, blanket box, wooden chest etc it is more likely to be given space inside the house and so more likely to be used. The original one I made out of an old esky (see article in this section) worked extremely well but suffered from the fact that it looked like crap, even after Linda gave it a coat of silver paint to spruce it up it just looked like a silver painted old crap esky. So starting out with a nice looking container is a good thing, if you can build it even better, but since I made my original one I have bugged the living daylights out of Linda by saying of every bit of furniture we see that is box-like “you could make a hay box cooker out of that!”
The Insulation
There are a whole stack of things you can use as insulation and some obvious (and less obvious) ones are listed below -
- Hay or straw
- Crumpled newspaper
- Polystyrene foam
- Vacuum
- Blankets / clothing
- Wood wool/shavings
- Sleeping bag
- Wool /Feathers
- Leaves
- Perlite
- Sugar cane mulch (AKA bagasse)
There are no doubt other materials not on this list that you have access to and that could be considered as insulation for a stored heat cooker, but there are a few characteristics that are worth thinking about before you make your decision. Obviously enough the insulation must be able to withstand cooking temperatures, at least 100°C should be allowed for and it should not pump out toxic fumes or fibres. On the face of it, fibreglass (glasswool) would make a good choice, cheap, light and a great insulator, but it is nasty stuff to deal with so would not be a good idea.
Any insulating material should be able to be formed nice and snugly around the pot to reduce heat lost through convection and should be dry and able to be kept dry as insulation loses much of its insulating properties when wet due to conduction of the heat away through the water. Depending on the effectiveness of the insulation, it should be a minimum of 50 to 100mm thick (the exception here is when using a vacuum as the insulator, but that is difficult to home produce!). A very effective insulator like polystyrene foam need only be 50mm thick but the more traditional hay or straw should be 100mm thick as a minimum.
The Cooking Container
The pot could be made of a material that retains its heat well, such as Corning Ware, heavy stainless steel, well seasoned or enamelled cast iron, or stoneware but if your cooker is efficient enough, the material of construction of the pot won’t make that much difference. More important that the material of construction is the shape, it should have the smallest surface area per unit volume that you can manage. Of course the shape with the smallest surface area per unit volume is a sphere and spherical cooking pots are not that easy to come across, but the hint is short and squat like a billy not wide and flat like a frying pan.
The lid should also seal fairly well, have a lip so any condensing steam goes back into the pot and it should not have a steam hole as seems to be popular in pot lids these days. If the pot you wish to use is not perfect in the lid department but it is probably best to make up a bit of flour and water dough and use it to seal the rim and any steam holes the lid should have. I’ve tried this and it works really well.
Other Types of Stored Heat Cooker
There are commercial brand-name stored heat cookers on the market but the cheapest and most readily available commercial stored heat cooker is the wide mouth thermos flask, which uses a vacuum as the insulating medium. The vacuum flask makes a good cheap feed for one person and is portable so you could start it before going to work then take it to work for a hot, cooked lunch.
Interested in the idea but not sure if you want to go to all that effort? You can make an expedient stored heat cooker by preparing your dish as you would if you were going to transfer it to a stored heat cooker and then wrap it up in a blanket or two and stuff it into an eski, polystyrene broccoli box or if nothing else is available and corrugated cardboard box. This will give you some idea how they work and it is a great idea if you get a blackout in the middle of cooking dinner!
Getting the best out of your stored heat cooker
You can cook many standard recipes in your stored heat cooker, particularly if they are “wet” recipes like soups, stews, casseroles and the like so trawling through your recipe books for these and recipes designed for slow cookers and one pot dishes should net a whole stack of possibilities. There are some things to look at though in adapting the recipes for use with the stored heat cooker –
1. Multiply cooking times by 3 at least so that the food is cooked through. There will not be a continuous heat input during the cooking process and although there is plenty of heat put into the dish at the start as it slowly cools the time taken to cook the food fully extends. Having said that, even cheap cuts of meat cooked in the stored heat cooker will come out moist and tender every time because of that long slow cooking.
2. Reduce water in the recipe by 25%. The pot will be well sealed and without the continuous heat input driving off water you will find that you don’t need to put as much in to achieve the same consistency as you are used to.
3. Size the recipe so the pot is full, that way the maximum heat is stored in the food in the pot and it will retain its heat for the longest time, making for the most efficient cooking.
Using Your Stored Heat Cooker
OK, let’s say they you have built your cooker and found or developed a recipe to try out in it and you are ready to go, what next? First off, bring your pot to the boil using whatever heat source you have available. Gas or electricity is most likely but it adds to the fun if you have built a rocket stove or solar cooker of some description and that way you know that no fossil fuels at all have been burnt to cook your food.
When your pot has been brought to the boil you will need to keep it there for long enough to ensure that the heat gets right to the centre of portions of food that you are cooking, so that for something small like rice, five minutes on the boil might be enough but for larger food like, say, whole potatoes 15 minutes boiling would be required. Once the boiling time is completed seal up any steam holes or cracks with a flour and water dough and place the pot in the cooker. Leave the pot in the cooker for the calculated cooking time and remember NO PEEKING! It lets the heat and steam out, slowing down the cooking process.
Once the cooking time has elapsed remove your pot from the cooker and check the temperature, if the temperature has dropped down to cooler than you like, reheat before you serve it and then enjoy! If you have left the pot in a lot longer than you planned to it will not overcook but if it has cooled down to below 60°C, bring it to the boil and re-boil for 5 minutes or so just to make sure there are no problems with bacteria.
Other Uses
You stored heat cooker does have a few other uses that you can put it to, like making yogurt. Yogurt is simply made in your stored heat cooker by heating milk in the cooking pot to about 85°C for a few minutes then let it cool to 45°C, throw in a couple of tablespoons of natural yogurt or live culture and then place into your stored heat cooker and leave overnight. Add some fruit and (hush, hush) maybe a bit of sugar and you have homemade yogurt.
You and also use it to place bread dough in to rise in cold weather (if it is big enough), use it to keep food cold in hot weather. If your cooker is portable you can use it to keep food hot while travelling to give you a good hot meal on the road and if you have pots that fit your solar cooker, you can cook stuff during the day and then use the stored heat cooker to keep it hot until time for your evening meal.
Potential Difficulties
Like all technologies, this one is not a totally unmixed blessing, as with any slow cooker you can’t decide you want to eat in half an hour, your meals must be planned to give you sufficient time to prepare them and then have them stay in the cooker long enough to finish the cooking time. The stored heat cooker’s forte is not small meals, it is at its most efficient when you have the pots full, so if you are cooking for a crowd that’s great but if not you may have plenty over to freeze for later! You also need to keep an eye on the insulating material, particularly if it is organic, as it can become damp with cooking steam and lose part of its insulating properties. The damp can also encourage bugs with the consequent smell and risk of contamination so air the cooker regularly and if in doubt replace the insulation.
Resources
The fireless cookbook
http://archive.org/details/firelesscookbook00mitcrich
Thermal cooking Weblog
http://thermalcooker.wordpress.com/category/recipes-all/
