Thirty years ago and old friend of mine by the name of Bill Tarplee was operating a magazine out of Canberra and he wrote a series of articles on buying, doing up and looking after hand tools. Bill was a manual arts teacher at one stage, very skilful with his hands and knows all that there is to know about hand tools (among other things). I have been lucky enough to secure his permission to republish some of his original articles and here is the second one of this series.
The second hand shops, flea markets and school fetes are a rich source of second hand saws. If you know what you are looking for, and know how to judge what you see, you can buy rare bargains.
For our purposes we shall start by dividing saws into two groups – those that cut straight lines and those that cut curves.
The “straight” cutting saws can be divided into three groups:
The “rip” saw is one that cuts or rips along the grain; unusually it is of a reasonable size – about 60cm long. The teeth are similar in shape to the roof of an old factory, or a railway workshop. The teeth act as chisels and gouge the wood away, since they are cutting with the grain.
The “cross cut” is similar in size and shape but has sloping teeth. The teeth are sharpened on the sides to produce a razor edge. This enables the saw to slice through the wood fibres and cut across the grain. Many people cannot tell the difference between the two, yet it is quite apparent when you know what to look for. Either saw will do the job of the other, but not as well.
Cross cut saws come in a number of sizes ranging from 40cm to 66cm. They all have their uses although I wouldn’t bother with any saw under full size. If you are going to use a saw properly, you need a decent length to get a full cut per stroke. In restricted areas I would select another saw.
There are “old” saws and there are old saws. The simple rule is that anything of quality will be taper ground. In other words the top edge or “back” will be slightly thinner than the metal just above the teeth. The grinding away of a bit of metal means that the saw is less likely to jam with saw dust. In other words, it makes the operators’ job easier, which is a sure sign of quality. That is not to say that any saw that is taper ground is a good saw. If it has been in a fire or badly bent, it won’t be as good as a cheap make.
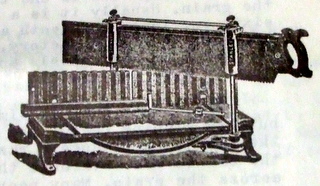
One group of saws come with stiff metal backing rib. While usually known as “tenon” saws they may be one of a number of special purpose saws including mitre box saws. Mire box saws are about 60cm long and are designed to fit in a mitre box. Which raises the point that if you ever see a mitre box at a reasonable price – say from $1 to $20 (1980s pricing) it could be a very sound investment. Mitre boxes will enable you to cut angles to a precision that is hard to match with free hand cutting.
The tenon saw (named for cutting tenons as in mortise and tenon joints) is the most common saw in this group. They range in size from 20cm to 40cm. They are a very useful saw, and frequently disposed of, when grandpa goes to that big joinery shop in the sky.
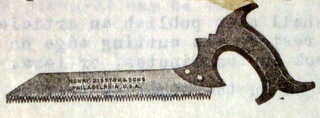
Dovetail saws are just a smaller version of a tenon saw. They come in two versions, either with an open handle or with a peg type handle; the sizes are about the same. I am of the opinion that the handle shape was a matter of personal preference, rather than a difference between saws.
All of the backed saws may on occasion be found with a brass stiffening rib. As far as I can tell, brass was not a sign of quality. In the “good old days” brass was much cheaper than steel, and so was probably used as a cost cutting factor.
Saws are measured by the number of points per inch. A fine tenon saw could have had as many as twelve teeth per inch and the big rip saws as few as four. So it is the number of points as well as length that determines the timber removing ability.
From time to time, one will see various types of crosscut saws in the marketplace. Of all that I have seen so far, I’ve only ever seen one worth buying and I did! They mostly seem to have been stored out in a shed, or in the weather. There are usually covered with rust pits, which makes them almost useless.
Crosscuts are of two types, the one man, which is simply an oversized crosscut saw, with a hole for a peg at the toe of the saw. As the name implies it is for use by one man, although two can use it if required.
The two man cross cut is a far thinner bladed saw with a peg on each end, it can only be pulled in the cut, hence the two pegs.
There is a deal of skill required in using a two man saw, and many feuds can stem from someone who is not pulling his/her weight. They also require skill in keeping them to a straight cut. Unless you have big timber lying about you are better off with a one-man. (you can’t – usually – argue with yourself).
You will find that lengths will range from 1 to 2 metres and points from 2 to 4. Teeth will vary in shape quite considerably.
Any good crosscut will have a ground blade, it may be half the blade thickness at the back and since these saws can jam very easily, this is an important point.
Anyone using one of these saws is well advised to have a tin of floor wax or car polish on hand. A liberal dose of wax every 10 minutes or so will make the job a great deal easier, and enable the saw to cut faster.
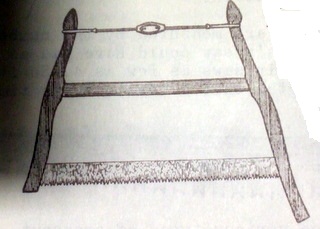
Curve cutting saws are a varied lot. Of the framed saws the largest is the buck saw, they are normally used for cutting up fire wood. The blades are up to 76cm long and as much as 6 cm deep. The teeth were often patented types, which could make them somewhat difficult to sharpen, besides which some where hardened to a degree that made them difficult to file. Being a wooden frame they had a habit of breaking, being wood they are fairly easy to repair.
Another frame saw is the bow saw. Similar in appearance it is used for cutting curves (the buck is not usually regarded as a curve cutting saw). The blade in the bow saw can be turned in the frame, after tension has been released by turning the turnbuckle at the top. Both of these saws should only be used by gripping one end, the fact that the bow saw has knobs at both ends is for turning the blade, not holding. Bow saws are about 40cm long, the blade about 7mm wide. Replacement blades could be hard to find, it could be necessary to cut a length of band saw blade to fit.
For cutting thin timber, say up to 25mm or so, the coping saw is ideal. There are a lot of varieties about and unless you can get a Turner or a Stanley, or other good make, be prepared for some problems.
Blades are fitted by holding the pin inside the frame and unscrewing the handle five or six turns. The two pins are moved to the desired angle and the handle screwed up. Make sure the two pins are at the same angle.
When the handle is screwed up tight there should be no movement between the handle and the frame. The rear pin and spindle should be reasonably tight in the frame. Also the metal ferrule over the handle should be of good length to prevent the handle from pulling off. Should the handle pull away, lightly grease the threaded spindle and pack plastic putty into the handle. Take the blade from the frame and then screw the handle back on. The plastic putty will set and hold the handle in place. The handle will unscrew again because the grease will stop the plastic putty from sticking to the threads.
Coping saws are sometimes mistakenly called fret saws. Fret saws are much deeper in the frame and use a finer blade. As the name suggests they are used for “fret work” which is an ornamental cutting of thin wood as found on old fashioned radios, sewing boxes etc. It is a hobby that had died out but the saw is a useful tool to have if you can locate suitable blades. (some larger hardware stores stock piercing saw blades which will cut both wood and soft metal, and fit a fret saw.)
Both fret and coping saws can be started in from an edge by drilling a small hole through which the blade is passed. The saw is then fitted to the blade and the cutting commences. Fret saw kits came complete with an awl for just this purpose. (on some jobs it may be necessary to use a coping saw to cut a slot so that you can start the toe of a crosscut or rip saw.)
A group of saws that have fallen out of favour are the keyhole and compass saws. When sold with three blades they are known as a nest of saws.
Keyhole saws have a number of uses. With the fine pointed blade it is possible to start a cut working from a small hole. In soft timber it is sometimes possible to start without a hole. By pushing the point into the timber and pulling back so that the teeth cut on the back stroke, you can work the saw through the wood. (I have started tenon saws in this way when sawing ply). The one point to watch is that you don’t bend the narrow blade. For some reason these saws usually come with blades that are less springy than other saws. If the blade is set to a coarse set, it is easy to cut a fairly tight curve with them. This is particularly true when the inner side of the curve is not required. In that case you can use the edge of the blade as a rasp, and by constantly backing off and cutting with just one side of the saw, can cut very tight curves.
Keyhole and coping saws are frequently confused with pruning saws sold by nurseries. This is understandable since early models came with a pruning blade. Pruning blades are wider, less tapered and have teeth that cut as the blade is pulled towards the operator. They can be used for normal cutting purposes if and when required.
A similar and very useful saw is the pad saw. Usually they come with a very short blade – say 15 cm or so. On occasion they will be found with metal cutting blades. As an alternative, you can often fit a broken hacksaw blade to one. This will enable you to cut either wood or metal as the case may be.
I have seen them with wooden and metal handles and a recent trend has been to market a metal pistol grip version. This would probably be the most useful shape of all. When using a pad saw i like to fit the blade so that it cuts on the pulling stroke, it is far easier on the blade.
For special jobs you can make up a temporary pad saw by taking a short piece of dowel, slitting the end and fitting a jig saw (sabre saw) blade secured with a screw. With this arrangement you can start a hole of sufficient length to start a rip or crosscut. Makes people wonder sometimes how you started a cut without any lead in. (That is what is known as a “trick of the trade”)
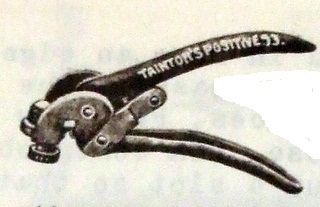
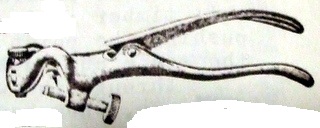
The pliers looking device shown here is a saw set, they are used to bend or “set” the saw teeth to the required angle.
Unlike pliers, the jaws are fixed. Squeezing the handles causes a tongue to project and push against the anvil. If you do buy a second hand set, check and see that the tongue has not worn away, or become misshapen. Also make sure that it comes hard up against a (usually) circular block. This should have one edge ground off to an increasing degree as it goes around the circumference. Often there are numbers stamped around the side - 16, 12, 8, 6 etc.
Saw sets can be bought new for only a few dollars but you will sometimes see them in the marketplace. Few people know what they are and fewer people know how to sharpen a saw.
Screws - as in holding the handle – can be purchased in a few of the larger hardware stores. There is not much point in buying them unless you need them, but it is useful to know that you can still buy them if required.
It is also possible to buy saw handles in the large stores. The ones I have seen had second rate timbers in them, but could save you the work of having to make a handle. Personally I’d prefer to make a handle if I had the right timber. It is necessary to use a fine, close grained wood – beech, apple or something similar, though even pine would do in a pinch.
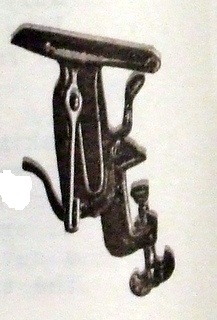
Saw vices are cast iron devices that clamp to a bench and hold the saw blade for setting and filing. They are even less recognised than saw sets and you just might happen across one sometime. I am still looking but you never know your luck. (Note: The instructions for making a homemade saw vice may be found here)
The points to look for with a saw vice would be the condition of the jaws, how it mounts, and whether it is adjustable. Over the years it is likely that the tops of the jaws would be file marked. This would not matter if the cuts were not too deep.
You should check that the jaws close evenly along their full length , sometimes they get “sprung” and will not grasp the blade properly, the blade can then drop at one end when the file pressure is applied.
If the vice is adjustable for different blade thicknesses it might be possible to file away the inner faces to a degree where you would again have the jaws parallel. You would want to look at this point before you parted with hard cash. While it is usually possible to fix tools, sometimes it is just not worth the time and amount of effort required.


