Wheelie bins have a number of advantages when used as rain water cisterns –
- They are watertight
- They have a built in lid to reduce evaporation
- They are sturdy and can put up with a considerable weight of water
- They come in different sizes
- They are transportable, although a bit difficult to move around if they are more than ¾ full of water
- They are comparatively cheap and available
I had a spare wheelie bin hanging around that I had bought with a project in mind that never eventuated and I also needed to catch some of the water coming off our new car port roof, rather than letting it turn a part of the yard into a swamp.
So having decided on my course of action (and keeping an eye on the gathering storm clouds!) measured up the wheelie bin footprint and the downpipe that I had to work with. The downpipe turned out to be 65mm diameter for some reason rather than the more common 50mm. I would rather have had 50mm because there are many more standard fittings for 50mm but I wasn’t here when the thing was put in so I had no say in the matter.
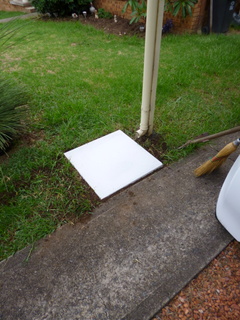
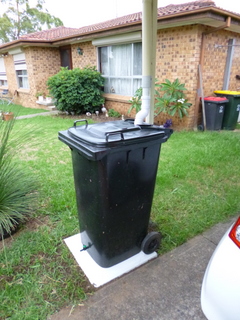
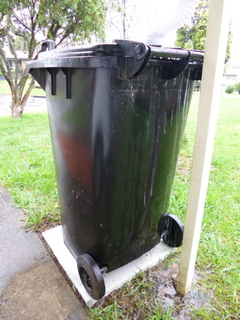
I worked out that the wheelie bin would sit nicely on a 600mm x 600mm concrete slab, and the cheapest way would have been to put some formwork up and cast it in place with a bag of concrete mix. Unfortunately I am somewhat impatient and my concrete finishing skills are pretty crap so I bought a slab the right size and about 50mm thick and installed it. I dug it in to level it up a bit, put some sand under it and then fooled around with it using a spirit level until it was more or less level. It makes subsequent operations easier if your work surface is flat and level to start with.
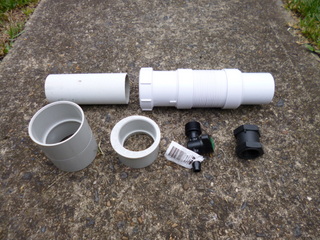
The fittings and tools that I needed to set up the wheelie bin were –
- A 25mm spade bit (and a drill to drive it of course)
- A hole saw (and the drill as above)
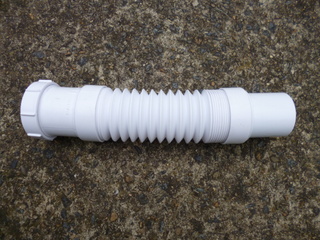
- One x 50mm Trap Connector which is a flexible pipe with a fitting that sits into the hole in the wheelie bin lid on one end and a 50mm socket on the other.
- One x PVC reducer socket from 65mm to 50mm
- One x 65mm straight PVC coupling
- A short length of 50mm downpipe
- One x 13mm barb to 20mm thread inline tap which can be found in the irrigation section of your local hardware
- One x ¾ inch BSP socket, which can also be found in the irrigation section.
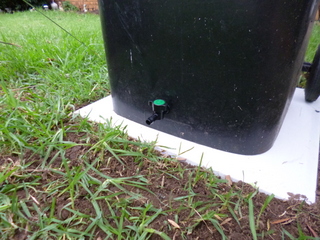
The first part of the process once the slab is in place is to install the 13mm barb to 20mm thread inline tap, because this involves laying the wheelie bin over and that is easier to do before the other stuff is installed. With the wheelie bin horizontal I made a mark on the front section of the wheelie bin, about 150mm up from the bottom in the centre with the sharp bit of the spade bit. My bin is black and I don’t have one of those white felt tipped pens so the only way I could make a mark I could see was to dig into the smooth surface a bit where I wanted the hole to be.
That being done I used the 25mm spade bit and drill to make the hole. I could then screw the inline tap into the hole from the front easily enough but needed to screw the ¾” (20mm) BSP socket on the thread on the other side to secure it and this necessitated crawling inside the bin. Now, a trap for young players! The bin has been left to its own devices sitting around in the back yard for a couple of years and to make sure it was OK I looked into it but saw nothing. With the bin on its side and Linda holding the tap to prevent it rotating I started to climb into the wheelie bin and hit.....you guessed it... spider web invisible from the top of the bin. I backed out and then grabbed a broom to use the handle to remove the rest of the web and what came out with it was a medium sized, evil looking and quite disgruntled spider. Note to self: if I ever do this again, completely clean out bin before starting!
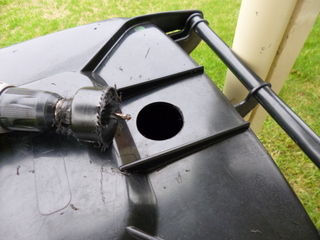
With the spider relocated I was able to complete the securing of the tap with little difficulty and then pull the bin upright for the next operation, i.e. using the 50mm hole saw to drill a hole for the trap connector in the lid. I drilled the hole in the centre rear of the bin lid, as far back as I could manage without hitting the side wall. Unfortunately, when I tried to fit the trap connector I found it was still a bit too large so I had to attack the hole with a half-round file. This enabled me to remove the small amount of plastic required for the trap end to slip in easily.
I assembled the whole downpipe connection unit and then compared it to the existing downpipe and made a mark on it where it would come up to, then using a hand saw cut the downpipe off at the required height from the ground. The downpipe I cut off has been squirreled away into storage where it may become handy for yet another project.
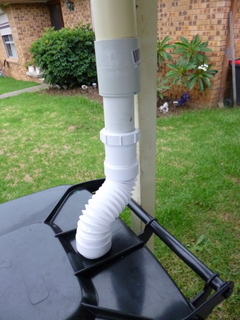
To fit the trap to the downpipe I first had to glue (using PVC plumber’s glue) the PVC reducer socket into one end of the 65mm PVC straight coupling. I then placed the other end of the coupling over the cut off bottom of the downpipe so that the diameter of the downpipe was reduced from 65mm to 50mm. I then jammed one end of the short length of cut off 50mm downpipe into the top end of the trap and the other end into the bottom of the 50mm reducer connected to the down pipe.
The Trap has a length of 50mm diameter concertina hose built into it so it can be used when the pipes to be connected are not exactly aligned. It took a little bit of pushing and shoving to get everything to fit but in the end it went together pretty quickly. I have not built an overflow pipe into the system yet and when overfull the wheelie bin pretends that it is a waterfall. As luck would have it, I had no sooner finished connecting everything up when we had a bit of a cloudburst and the bin was full in an hour.
To use the water it is my intention for the moment to jam a length of garden hose on the barb fitting when and then gravity feed it onto the fruit tree circle as a form of irrigation but I have some designs for a foot powered pump, so we will see how that goes!


