


We know that sustainable living is more than just about growing fruit and veggies, but providing our own local, organically grown food using Permaculture principles is not only intensely satisfying it also makes great economic and environmental sense. We live on 600m2 in Sydney’s greater west and for years I would contribute to the family larder by growing vegetables but what this meant generally was –
- Cultivating like mad each spring using a petrol powered rotary hoe
- Buy in lots of manure (primarily chook and horse), spread it around and dig in
- Buy in a load of straw and mulch everything in sight
- Buy in a load of seedlings and plant everything in sight.
The result of this fevered action was trickle of vegetables into summer, a glut of just about everything in mid to late summer and then little else from then through to the next spring when the whole thing started again. There had to be a better way!
The Five Processes
This was not only expensive it was not particularly environmentally friendly either so over time I developed a series of processes that has made us much more self reliant and reduced our outgo and environmental impact at the same time. This is how we did it, using five innovations developed by others or ourselves –
- Developing a sowing plan
- Putting in the Plots
- Raising our own seedlings
- Installing the chooks
- Saving our seed
Developing a sowing Plan
I needed to be able to provide a mix of veggies for us throughout the year and to do that I needed to develop a sowing plan that showed me how much of what veggies to plant when. Seeing as nothing like that existed that I could find, I developed my own.

I got hold of seed catalogues from producers of open pollinated heritage seeds and scoured them to work out what varieties suit our climate and when to sow them. Over the years we have experimented with different varieties of the some of the vegetables to spread your growing season. I then worked out (guessed really) how much of each vegetable we wanted to plant at each time, mind you the plan is always evolving and some things we discovered we wanted to grow more of over time, others we reduced because we didn’t like them as much or as often as I thought we might.

Then, to develop a sowing plan, I worked out how often we needed to sow/plant out your veggies, based on twice monthly sowings. I then drew up a matrix with the name and variety of each veggie we wanted to grow down one side and the interval of sowing across the top. To make it easy for me to develop and keep up-to-date I use an Excel® spreadsheet on our computer.
Putting in the Plots
We have Fourteen 1.2 metre x 2 metre veggie plots that are divided by 100mm square wooden borders and the plan that I developed allows us to plant one out every two weeks, so that if you were to come to visit at any time of the year you would find plots producing veggies, plots growing up getting ready to produce, plots freshly planted out and plots ready to be dug over.

Originally I double dug the plots and even used a small rotary hoe but now we don’t dig the plots over at all, we put the chook tractor on them to dig over from above and then mulch to attract worms that come in and dig from below. How we are practicing crop rotation is covered here.
Raising Seedlings
We make our own seed raising mixture based on one part coarse sand, two parts worm castings (from our worm bath) and three parts cocopeat, this is placed into eight compartment punnets, one type of veggie in each compartment. I fill up the punnets with our seed raising mix and then use my finger to press down each compartment. When the seeds go in each compartment I fill it with seed raising mix to the top, which aids air drainage (and preventing damping off) and it also shows me which compartments are yet to be sown with seeds. A label finishes the process off.

")
For large seeds like corn or beans where we need a quite a few they get sown in several (6 or 8) punnets of their own. The full punnets are placed in a cat litter tray half full of damp sand to keep them moist and left in the greenhouse for about two weeks. Once the seedlings are up and at the four leaf stage they are potted on into rolled newspaper pots filled with the same seed raising mix. They stay in the greenhouse for two to four weeks, that way they get a good start ahead of the pests, and they can be left a bit longer if you get busy or the weather turns to crap!
Installing the Chooks
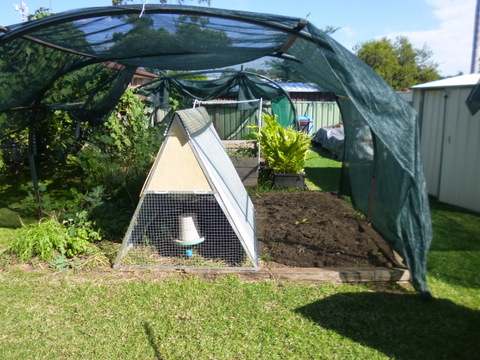
For many years we had chooks in a dedicated chook pen, but after reading about the Permaculture way of doing things we decided to put a chook tractor together so that the chooks could dig over and manure the plots for us, while still providing wonderful eggs. I built the tractor from scratch; it is A-frame in shape and has the same footprint as the veggie patches with the bottom surrounded by chook wire and the enclosed top housing laying and roosting areas.

As mentioned earlier, they spend two weeks on each bed cleaning and manuring prior to replanting. When it comes time to move to the next bed all I do is cut down the taller stuff with an old machete and then we get on each and of the tractor and carry it to the next bed to be dug over. The chooks love getting onto a new bed and line up along the side of the tractor to watch me cut down the next bed, clucking with excitement.
While the chooks in the tractor dig and manure the plots, we have a “retirement village” for those chooks getting a bit long in the tooth (or is that beak?) to produce eggs. The retirement village is a deep litter system based on locally produced grass hay what they dig over, break down and eat any weed seeds from. The result is used as mulch on the veggie plots and calls more willing workers (lotsa worms) to help break down and cultivate the soil once the chooks have moved on so I no longer need to cultivate at all beyond a light hoeing to break up any compaction due to the chooks, particularly in wet weather.
Saving our Seed
This closes the loop and means that we can develop our own seed varieties over time that are adapted to our climatic conditions. I started out with the bigger easier seed like peas, beans and corn but then graduated to the biennials like carrots and onions and the promiscuous ones like brassicas.

To do it properly we needed to allow room in the beds for veggies to complete their life cycle and of course we needed to start with open pollinated varieties but that was not a problem as we had only been using open pollinated varieties for years. It is then a case of identifying our best examples of the types of veggies we wanted to plant then saving the seed from them.
With a bit of time and effort and some land it IS possible to provide most of your veggie needs, i know because for over 10 years we have been doing it!
2020 Update
Since I wrote this, there have been a couple of things we have put in place which have turned out to be critical to our ability to grow food all year, particularly during the hotter months and we had to rejig our veggie beds a bit.
Veggie bed covers – I noticed the increasing difficulty of getting a decent harvest during January and February some years ago and started fooling around with shade covers for the veggie bed. We have had coves for when I put the seedlings in during the hotter parts of the year for upwards of 15 years, but this was new. The shade covers use 50% shade cloth to knock the intensity of the sun back, allowing the plants to grow and reducing their need for water in the hot weather.
I have tried different types but it appears to me that the best design is to get 50mm irrigation pipe and put it over star pickets, then run a bit of timber along to support the shade cloth. The shade cloth usually goes on mid-spring and comes off mid-autumn, so that we are covered for the hotter parts of the year, but full sun can get through in the cooler parts. Without the shade cloth, getting any harvest at all during summer would be difficult, and our water consumption with be greatly increased.
For more detail, check out here
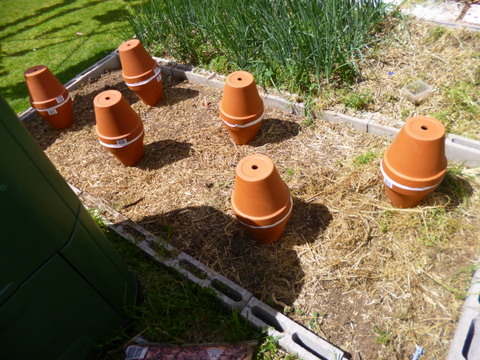
Olla Irrigation – ollas are unglazed terracotta pots, buried in the ground up to their neck, and kept full of water. The water seeps slowly into the ground keeping the veggies moist easily and efficiently. They can either be made from scratch using pottery techniques, then fired or built up using bought in commercial terracotta pots. We have a mix of both. Again, over the years, we have tried a number of lot tech, high efficiency irrigation techniques but we keep coming back to the ollas. Also, with the introduction of level 2 water restrictions in late 2019, ollas do not need the use of hoses for irrigation so we can continue to grow. We are in the process of replacing some buried pipe irrigation with more ollas.
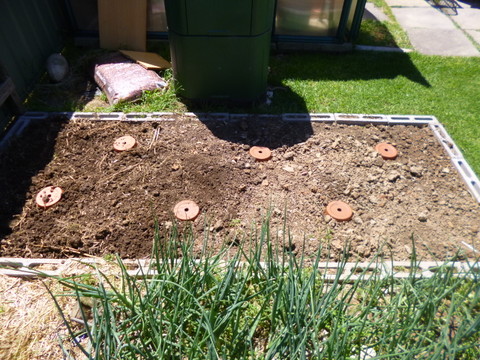
Veggie Beds - We have also had to muck around with our veggie beds a bit, and 7 (half) are now 3 metres long by 1.2 metres wide, giving us an extra 8 and a bit square metres of growing space, but which has to be balanced against the removal of the bed closest to the northern fence from service. The window of time we had to grow in it where there was sufficient direct sun was too small get a meaningful crop, so we do not use it any more. We have also started replacing some of the timber bed surrounds which are rotting, with besser bricks, as can be seen above.
