


There is a truism that says you can grow almost any plant in almost any soil; but the more fertile your soil is, the better the structure is and the more abundant the soil life is, the less you have to do to it to grow abundant fruit and vegetables. If your soil is so important to the growing process it seems to me that any information that you can glean about your soil will be worthwhile. By understanding your soil you can use techniques and additives that improve your soil over time rather than depleting it .
There are three aspects of the soil that can be investigated to help understand the soil we will be planting into –
Physical aspects – the type of soil and the constituents that go to make it up, which has an impact on soil structure, drainage etc.
Chemical aspects – how acid or alkaline the soil is and what sort of nutrient levels are present, which can impact how well any plants will grow can also affect the living organisms present in the soil.
Biological Aspects – what types of animal life can be found in your soil, which is also an indication of soil health.
I have used some tests that a “backyarder” such as myself can carry out where you do not need a PhD in soil science or the services of a fully staffed analytical laboratory, which is handy seeing as I have neither. Hopefully you can also use these tests to get a handle on how healthy or otherwise your soil is and use the results to plan on how you can improve your soil in the long term. Also, for those of a Permaculture persuasion, this can be some interesting research to carry out before you develop your Permaculture design.
If you are sampling your soil before putting in a veggie patch or some fruit trees it is a good idea to do your sampling a few months before you plan to start work, that way you get time to make adjustments if you find something out of kilter. It is a good idea to sample and test your growing areas every few years too, so you can keep a handle on how your soil is going. The actual time of year doesn’t matter so much but if you have disturbed the area, say by double digging a veggie bed, it would be best to let things settle down for a month or two before sampling.
Sampling your soil
In the same way that a chain is only as strong as its weakest link, your soil testing result is only as good as the samples you have taken. Take enough and combine them well to form homogenous soil mix and your testing regime will be reasonably accurate. Do a crap job of sampling and your results will be skewed, so any decisions taken on the basis of those results will be crap too. It is the classic data cliché – garbage in = garbage out. So it is worth getting this step right!
The first thing is to look at your yard and where you intend to grow your fruit, veg and herbs, to identify the areas you wish to test. In our case we have three “blocks” of veggie patches we grow things in (plus a single patch over by the northern fence), and there are also a number of fruit tree growing areas too. To facilitate this, a map of the area you are going to sample will come in handy, even a hand drawn mud map will help.
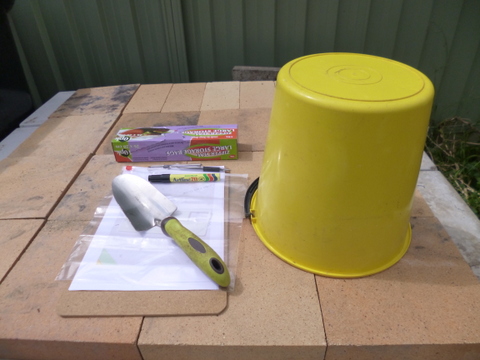
What you will need
- A clean spade or trowel ( while it doesn’t matter for the purposes of this exercise, if you think you might want a full, professional analysis done on your samples at some later stage, do not use brass or galvanised tools to take the samples, it will give a falsely high reading on copper or zinc)
- A bucket (plastic works well here, a galvanised one may cause obvious problems)
- Pen & Paper (for any notes) and a clip board really helps!
- Your mud Map
- Plastic bags – large, resealable and felt tip pen for labelling
Look over the area you wish to sample and then mark out where you are going to take your samples using a zigzag pattern, working from one side of the area to the other with the sample areas about a metre apart. For most backyard veggie growing areas 5 or 6 samples would be plenty. The sample depth should be as follows:
- Usual veggie garden type areas – 100 to 150mm
- Shrub areas like some larger herbs or berry bushes – 150 to 200mm
- Trees such as fruit or nut trees – 100 to 200mm
Taking the samples
Brush away any mulch or vegetation on top of the soil before taking a sub-sample. Using your spade or trowel, dig a vee shaped hole down to the required depth. Place the spade or trowel near the edge of the hole at about 1 centimetre away. Push down steadily so that you cut a 1 cm slice from the ground level all the way down to your sample depth. Pick up the slice and dump it into your bucket. Move to the next sample area and repeat the process until all areas have been sampled.
Using your hand, break up any soil lumps and then scoop the soil around in the bucket to ensure it is well mixed. If there has been rain and the soil is a bit muddy you may need to let the sample dry out a bit, do this by spreading it out on clean paper out of the sun and let it air dry naturally for a few hours. Alternatively, sample after the soil has had time to dry out a bit.
Once you are happy with your sample, place it into the plastic bag. If you have more than one sample don’t forget to label each one and then mark on your mud map where the samples were taken.
Recording
As well as marking your soil sample points on your mud map, it is handy to keep a tally of what samples have been taken where and when, what tests have been done on them and what the results of the tests were. One way to do this is to fill out the Soil Test Results Sheet, available here. This will help you keep a running tally of where you are at with your soil testing program and provide a handy summary to be reviewed when you are making decisions about soil improvements. If you are doing this for somebody else it also acts as a useful one page report that you can give them.
Read about the physical and chemical aspects of soil testing
