


We like carrots and probably have them with our main meal of the day four to five times a week, so we go through quite a few. For the last six or seven years we have been growing over 90% of the carrots we consume, it varies a bit from year to year and some years it has been 100%. The process we use is quite simple and easy to replicate, depending on your climate. The guts of the process came from Peter Bennett’s book “Organic Gardening” and I have continued to refine to it meet our particular situation over the years.

Preparing the Seed Bed
As part of our rotation, I make sure the bed I intend to use has not grown any carrots for several years at least. The soil should be friable and reasonably fine grained to provide a good seed bed. After the chook tractor has been moved off I give the soil a week or two to settle down, watering at this stage can help. I then level the soil out with the back of a steel rake and give it a hoe to break down any lumps, then a final levelling with the back of the rake. I then tamp the soil down with the flat face of the hoe to make sure it provides a good solid seed bed.
While a high nitrogen fertiliser (like chook poo) can result in more top than carrot, we find this process works for us.
Sowing
Our beds are mostly 2 metres by 1.2 metres so to get sufficient carrots for two people for a year means they are sown pretty thickly. I just do that by hand, I don’t bother to mix the seed with sand to help even things out as has been suggested by others I just sow it thickly and leave it at that. Once the seed has been sown I cover it with some cocopeat, usually only three to five millimetres thick, and then go over the whole surface of the bed again, tamping it down with the flat face of the hoe to ensure good soil/seed contact.
Covering the Bed
With the seed sown I give the bed a good watering from a trigger nozzle set on ‘shower’ or a watering can, gentle watering means not dislodging any of the seed. The trick to good germination is keeping the seed moist for the entire time, so I cover the seed bed with hessian bags but you could use underfelt or other porous fabric which allows you to water through it.
Germination
In the colder time of the year like early spring it can take up to three weeks for the seed to germinate but germination in early summer may only take a week or two. Check every couple of days to make sure the seed is still moist and that germination hasn’t started. Once germination has started, remove the fabric and allow the seedlings access to light.
Protecting the Seedlings
If you are germinating during the hotter part of the year you may consider making a portable sun shade but even if you are starting your carrots off in the cooler times your bed may still need protection, perhaps from birds, but around here from cats. The carrot seedlings are very small and all of the freshly dug uncovered soil screams “toilet!!!” to the local cat population. Nothing is quite so infuriating as going down to inspect your newly sprouted carrot seedlings and finding a mound of freshly dug earth in the middle of the patch with a cat turd ensconced in its centre.
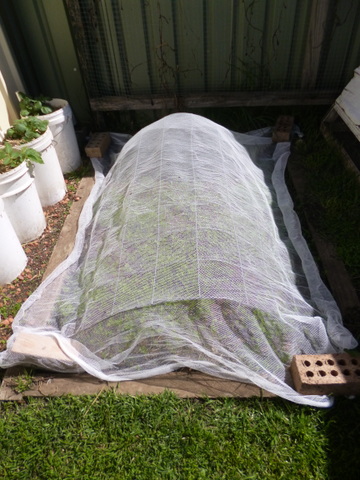
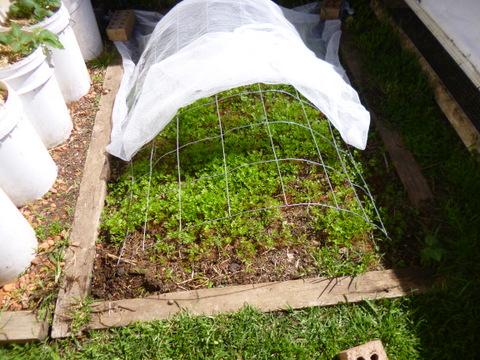
Anyway, to get around this I have some 100mm x 100mm square wire mesh which I place in a semicircle over the top of the bed, and then I cover it with white bird mesh which effectively excludes the cats and birds. It also allows me to water straight through it while the seedlings are still small. I leave it on until the carrot tops get big enough so that the bare soil is no longer visible, say 50 – 100mm high.
Harvesting
With the seedlings well up it is just a case of letting nature take its course and the carrots continue to grow. Keep an eye on the width of the part of the carrot root above ground, wider root generally means bigger carrot. You can start harvesting as soon as the carrots get big enough to be worthwhile. You can harvest a few small carrots from the most thickly sown areas for each person and use them as baby carrots, this will allow the remaining carrots to continue to grow and expand.
The carrots will continue to grow through the summer, autumn and winter enabling you to harvest and use them as you need, eliminating any requirement to preserve them. As the year moves on into spring, some will send up a seed head because carrots are biennial and this will be their second year of growth. It is for this reason that I like to plant my carrots towards the end of winter, so that I spread the harvest over as wide a timeframe as possible. You won’t want to save seed from the first ones that bolt, save the seed from the ones which hold in the ground the longest and bolt latest in the season.
And it all starts again!
If you have got everything right the carrots you plant this year will start to come into bearing just as any from last year’s crop are starting to bolt. You could mount a pre-emptive strike and bottle or dry any remaining carrots late in the winter or just let things go and see how they work out. At worst you might have to buy a bag or two between the finish of last year’s carrots and this year’s getting to a size to be worth harvesting. We have probable bought maybe half a dozen bags of carrots (organic of course!) in the last five to six years so the process does work
