


This series of articles were originally published in the Australasian Survivor Magazine back in the early 1980s. They were written for the magazine by a small scale founder by the name of Paul.
This is the third article in our series on backyard foundry work and covers what the previous pieces have been leading up to – actually making a mould.
I haven’t said anything yet about patternmaking, although by rights this should precede any discussion on mouldmaking. Patternmakers like to cultivate an aura of mystery, but basically the trade is a scaled down variant of carpentry. I hope to provide a brief rundown in a later article – meanwhile, to illustrate this section on moulding techniques I’ll give an example or two of patterns readers might already have on hand.
Flat Base Patterns
A pattern with a flat base is the simplest to mould, as only the drag (bottom) box needs to be rammed up around it.
Perhaps an aluminium or brass handle (“scale” type) would complement one of the coil spring knives described in another article. The two wooden scales provide the pattern. The wood needn’t be anything fancier than a bit of pine.
Shape the two halves as you wish, and arrange on the moulding board as shown. A piece of ¼”(6mm) ply, or even a large breadboard, makes a perfectly adequate moulding “turn-over” board – as long as the dimensions are greater than those of the box. The particular box for the job is chosen after allowing for a clearance of at least an inch (25mm) between the sides of the box and the extremities of the pattern.
The only point on the diagram which probably need clarification is the dotted circle representing the “runner”. A runner is simply a hollow tube moulded in the sand, down which the metal is poured, to reach the cavities left by the pattern. More on this later.
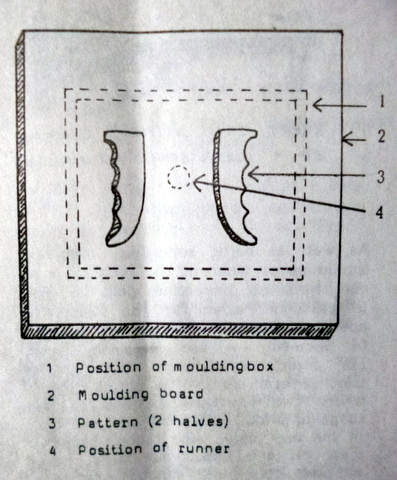
Position the drag as shown, upside down ie the brackets flat on the board. Either the male or the female box can act as drag with the proviso that you will need two holes (with adequate clearance to avoid sticking) in the moulding board to accommodate the locating pins, if the male box is used. Alternatively, the board could be slightly bigger than the box – but small enough to allow the pins to overhang on either side.
A Bench
Smaller jobs are more easily made on a bench; bigger jobs are generally made directly on the floor. Moulding benches usually include some sort of trough to hold the sand required for the job in hand. One kind of bench is just a wooden trough on legs with three or four 6” x 1” (150mm x 25mm) boards set across it to mould on. The boards can be fixed or movable. The bench illustrated below provides a bit more bench space for boxes, patterns, tools etc.

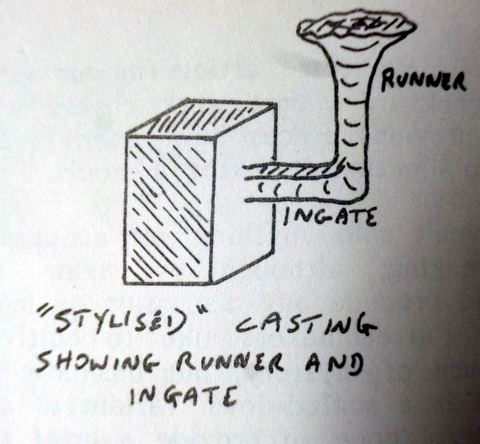
Runners
As well as being something moulders should never wear in a foundry, runners have an important part to ply in casting. Positioning the runner is not a problem with the simple sort of patterns we are discussing here. For some complicated arrangements (say several parts of a small engine) where two or more patterns of odd shaped or widely different cast size are cast tin the one mould, the runner becomes more critical. Experience might provide the door, but common sense is still the key.
Two things to remember:
1) The runner should be close to the cavity/cavities, so the “ingates” (the connections between the runner and the mould) are kept short. This is to prevent the molten metal from solidifying before reaching the cavity or cavities.
However, it shouldn’t be too close as the pressure of the molten metal could wash away the sand between the runner and the mould, ruining the casting.
2) Remember that when the mould is cast, all hollow spaces are filled with metal.
The runner and ingate are broken or cut off the casting once it has cooled. Hence the runner should be placed so that its attachment to the casting causes fewest problems in the later machining and cleaning of the casting. This is the reason I’ve shown the backs of the knife scales facing the runners: when the ingates are cut, it is an easy matter to file down the stubs left behind.
Making the Mould
Prepare a batch of sand as per last article. You’ll find a water can with a spray ‘rose’ and ¼” (6mm) mesh sieve useful aids for this. Bear in mind that sand co presses when it’s rammed: it is much better to have more sand than you need than not enough, anyway.
At this stage the box, patterns and board should be set up as in the first diagram.
Begin by covering the patterns thoroughly with sand, pressing firmly by hand around the sides, and fill in any crevices and “fiddly bits” with pinches of sand.
Now add more sand until it is at a level above the depth of the patterns, and begin ramming (gently but firmly) with the broomstick ramming tool described in part 2. You might find it useful to shape one end of the tool into a blunt wedge for ramming sand into the corners and angles of the pattern and box. (A larger rammer with speed up the job with larger moulds – perhaps a two foot length (600mm) of two-by-four (50mm x 100mm) with a handle carved at one end.
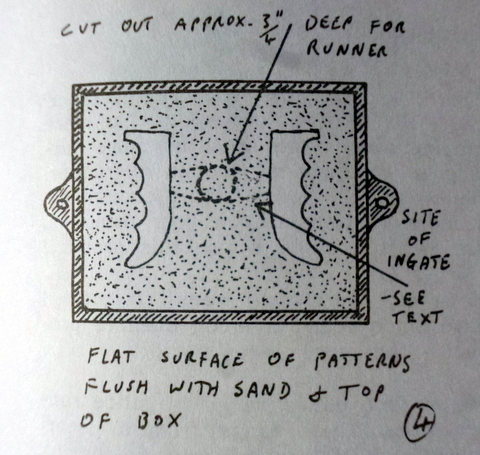
Add kore sand and ram in stages, making sure the whole surface of the sand gets equal attention. Continue adding sand and ramming until the box is just over full and then “strickle” off the surf surplus sand, ie scrape off the surplus sand with a straight-edge flush with the four sides of the box.
Turn the box together with the moulding board right side up. If properly rammed the sand won’t fall out. Remove the moulding board, and what you see should be something like this –
If the surface of the sand near the pattern shows signs of small cracks it indicates over-hard ramming. Knock out the box and start again. Over-hard rammed moulds have a nasty habit of erupting during casting, as very tightly compressed sand loses its permeability to gases.
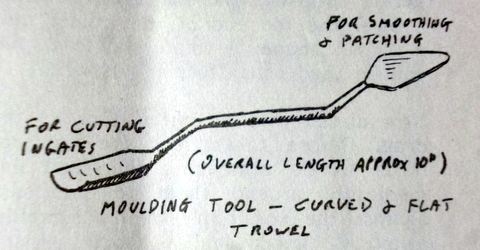
It’s probably time for a quick review of some of the tools I described in part 2. A small gardener’s trowel (that’s a small trowel, not a midget gardener), ground down to about half size and the sides squeezed in; or even a spoon can be used for cutting ingates. A small plasterer’s trowel also cut down to say, a 1”x 3” (25mm x 75mm) blade can be used for smoothing and patching up. I also suggest and artist’s spatula for the really fine work. The ideal tool is, of course, the one designed for the job – the combined moulder’s trowel/ingate cutter.
You may be able to buy one at a second hand tool shop, or if you have access to a forge, use it!
Back to the moulding. Scoop out a small recess in the sand between the two patterns to accommodate the rounded end of the runner former to a depth of about ¾ “ (19mm). The former can be made form a length of 1” (25mm) diameter dowel or broomstick. It should be longer than the depth of the top moulding box.
Clean up and flatten any loose sand around where the runner former is sitting with the flat end of a trowel or spatula.
Dust the whole sand surface with parting powder. This is generally gypsum powder, but you can use coal dust or fine burnt sand which has lost its bond. Parting powder is applied to the face of the drag before the cope is rammed up so the two halves – you guessed it – will part! Most moulders keep it in a coarse-woven calico or similar cloth. Just shake one and you’ll see why.
Now fit the empty cope on top of the drag, pins in holes. Fill with sand and ram up as before – remember, gently at first, so as not to move or dislodge the runner former.
Strickle off the sand and “vent” by driving a small knitting needle, thin screw driver or similar sized piece of wire into the top a dozen or so times. This is to assist the escape of gas. Be careful not to go so deep as to touch the pattern.
Withdraw the runner former with a gentle rotation and lift off the cope. Trowel the top end of the runner into a funnel shape: a small plastic funnel can be used as a “former” as well.
Now direct your attention back to the drag. Before taking out the patterns it is worth moistening the sand immediately around them to safeguard against the possibility of it crumbling away. A good quality (soft) artist’s paintbrush is good for this job.
Next, cut out your ingates. Some people do this after the pattern is removed, but particularly for inexperienced moulders, there is a greater risk of damaging the mould. The ingates should be just slightly shallower than the depression left by the runner former, and they connect this depression with the cavities left by the patterns. Taper each ingate towards the mould so it’s easier to break or cut off the runner from the casting.
Take your rapping bar – a well pointed length of thin steel rod – gently tap it into the centre of balance of the pattern and gently rap it with the striker. Rap from several directions so the pattern is loosened uniformly. When it has been slightly loosened, draw it out with the rapping bar (or with a heavy pattern, withdraw the rapping bar and lift out eh pattern with a screw hook).
It is important to get a “feel” for rapping out patterns. Too heavy and you will damage the mould; too light and some sand could adhere to the pattern, particularly if there are any nooks and crannies in its underside. If there is any minor damage to the mould it can often be repaired with the fine trowel.
Before closing the mould, blow out any loose particles of sand. Any sort of small bellows will do for this. Dust both halves of the mould with plumbago (graphite) for a smoother finish, close up, stick a brick or similar weight on top, and its ready for casting.
Of course loose, flat-based patterns are only one in a pretty wide range of patterns than even the small scale operator is likely to come across, and “greensand” moulding is not the only way to make a mould. Part 4 will look at some other sorts of patterns and give a brief rundown on oilsand moulding.
