


A short while ago I was called upon to demonstrate saw sharpening as part of one of our Permaculture group round-robin meetings and it occurred to me that it is a useful skill that is disappearing from our home handypersons’ repertoire. Rather than write an article myself I decided to reprint this wonderful article from the 1980’s written by my old mate Bill Tarplee who is a craftsman in his own right. What he has written here is coming off the back of an article where he described how he reconditioned a couple of $2 saws he got from a trash and treasure market.
Last issue, we looked at refurbishing two old saws. To complete the job, it is necessary to resharpen them. For many, this is a process shrouded in mystery and secrecy. As you will see as you read on, this is just not the case. Sharpening saws (once they have been topped, shaped and set) should only take five to ten minutes at the most! It is a job that anyone should be able to do - once they know the very few basic rules.
The two saws that I bought for a dollar each, were in remarkably poor condition. In fact, one could go so far as to wonder just how a saw could fare so badly. The teeth weren’t even close to being the right shape or height. Whoever butchered the cross cut saw must have been a real drongo. No matter – it served my purpose, as I can show just how it should be done.
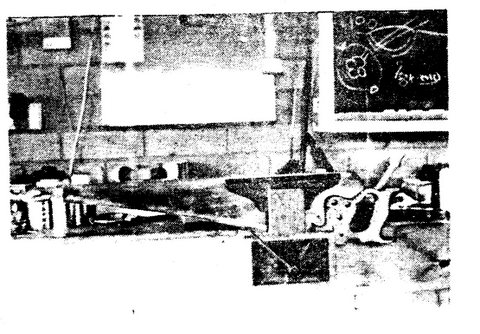
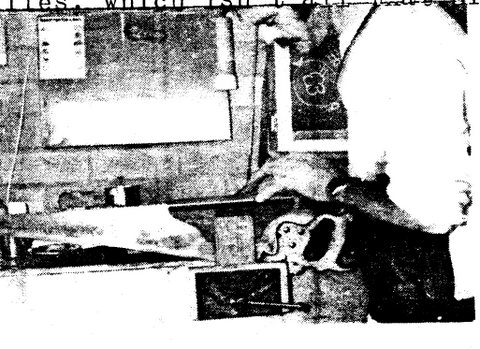
The first step with really badly sharpened saws, is to “top” the teeth. To do this you need a steady support and I would most strongly recommend your making up a saw sharpening vise. It is well worth the small amount of time it takes to make a good one, and it will last generations.
I selected the longest medium cut (mill saw) file that I had in the cupboard. I pulled off the plastic handle so that the file could lay flat along the blade. (plastic file handles are a real boon, as they can be fitted and removed frequently, without affecting their grip on the file tang). Note* whenever I buy a new file, which isn’t all that often, I mark the end of one side with a felt marking pen. That tells me not to use that side until the other side is worn out – or unless I need a sharp file for a specific purpose. In this instance I didn’t need the new side, but it is a small point worth bearing in mind.
With just a few minutes work, and by pushing the file the full length of the blade, I had filed away all the high teeth. I didn’t stop until the file was just starting to touch on the tops of the lowest teeth. At this point I had filed some teeth down to the bottom of the gullet. No matter, I’ll never have to top the saw for as long as I continue to sharpen it! If you have to file some teeth completely away, do so. Then at least you will be starting off on the right foot. After that you can compensate for any slightly higher teeth each time you re-sharpen.
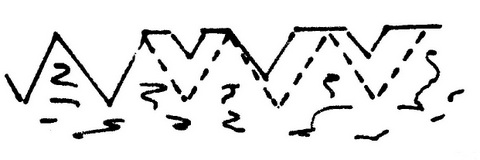
The next step is “shaping”. This is simply a matter of filing in the teeth again, till they are evenly spaced, and of equal depth. The only difficulty here is when you have completely cup teeth away during topping. I do it by eye, and find that is accurate enough – I doubt you’d be out by much more than a couple of thou (Thousandths of an inch) if you go carefully. In the sketch below I have shown the angle at which the file must be held to get the correct shape for each tooth. All the teeth should be of an equal depth, and the same shape. To do this, it is quite likely you will need to cut away more of one side of the tooth than the other. In the sketch above I have shown what could be a typical section of the blade. One tooth the desired depth, the rest need to be filed down to the dotted line to conform. Obviously it is not just a question of filing madly, but applying pressure to one side of the file to “pull” the tooth across to the desired place. Study what you are about to do before you start!
If you have had to file away a number of teeth, it is far better to start off each gullet and mark out the blade. Then go back over each tooth again. I filed in each tooth by working down the length of the blade four times, before I had them all at the correct spacing and depth.

When you are satisfied with the shape, you are ready for setting. Before you can set you need to know the number of teeth per inch. If you set a rule on top of the teeth, and then count the number of points between any two inch marks, you will know how many points per inch the saw is. My saw is 6 points per inch. The saw set was then adjusted to “6” on the little circular anvil, and I set every second tooth (having, of course, first determined which way the teeth had previously been set).

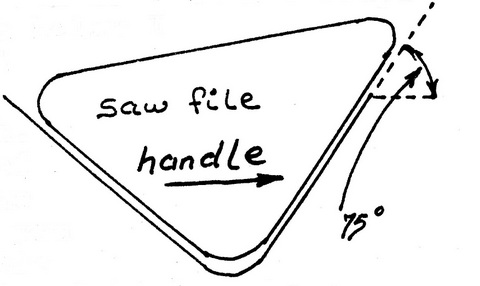
The saw set bends the top half of the tooth away from the operator. Once you have worked you way down the entire length of the blade, setting every second tooth, turn the saw about and set the alternate teeth. When you have finished, each tooth top should point away from the tooth on either side. If you were setting a rip saw, you could stop at this point, as the job would be done. Note* Rip saws are filed at 90°, as shown in the sketch below. They are a nice and simple saw, and should not take more than 5 minutes to touch up – so why put off such an easy job?

Anyway, back to cross-cuts. The last step is to sharpen the teeth. This is both simple and easy, but it requires a bit of concentration, and a steady hand (not to mention a sharp saw file). However, before I go any further, I would like to digress a bit. In sharpening, you will have to file every second tooth, and then turn the saw round and repeat the procedure on the teeth that were untouched. Nothing difficult about it – except that usually the phone rings or “it’s time for a cuppa”, or something. I always keep a felt marking pen handy. If I get interrupted, I can easily mark the last tooth done, and then pick it out at a later date. On big teeth this is not quite so important, but on small saws which are frequently sharpened, it can save a lot of trouble and unnecessary eye strain.
On the sketch on the below you will see that sharpening is divided into two sections. You can start from either end of the saw – that is up to you. All you have to do is pick which side of the tooth you are supposed to file. The basic rule is that you always file away from the back of the tooth that is pointing away from you. At the same time you will be filing off the back of the tooth that points towards you. Simple, isn’t it!
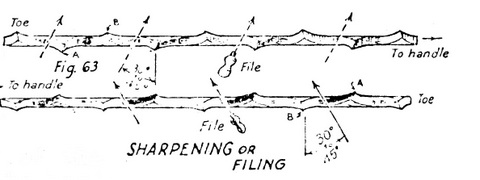
Two little tricks of the trade. Firstly, always stand at a 30 degree angle to the saw. That way you just file normally and the angle will always be constant. Secondly, always file the same number of strokes for each tooth. That way you will remove the same amount of metal each time and should NEVER need to top a saw again. (I’ve been the same saws for nearly 20 years, and have never topped one even once).
Also, lift the file slightly, on the return stroke. This will greatly extend the life of the file, and produce far sharper saws.
You can tell whether a tooth is sharp, simply by looking at the point. If you can see a tiny spot of reflection (it almost looks like a ball of light), then it is blunt! The teeth at each end of the blade rarely get used. When sharpening you may find that just two strokes of the file will remove the light spot. I’d suggest that you make at least four strokes, even though the teeth don’t need it. Then, when you get down to the middle of the saw, (still using the same number of strokes), you will be cutting away the amount of metal necessary to properly sharpen each tooth. If you find the necessary number of strokes is not sufficient to remove the light spot, go right along the saw on the first number. If a number of teeth are still blunt, do the entire saw gain – maybe three strokes per tooth. When I do a saw I don’t worry if a couple of teeth aren’t perfectly sharp, since I know that I’ll be resharpening after only a couple of hours (or less), and that I will pick them up next time. Once a point is blunt it won’t cut, and the rest will soon come down to the same level. (As I said before – I’ve never had to top one of my saws yet).
Bear in mind that the more you file, the sooner you will be faced with re-setting. This is no problem, but it does show that you have removed metal that can never be replaced. Also, the saw is that much closer to the day when you will have to throw it away as being of no further use. Better to leave the odd spot of light on the point!
It is my opinion that to do something properly, you should know why you are doing it!
Teeth are set so that the cut (it is called a “kerf”), is wider than the saw blade. This prevents friction and fouling of the blade in the kerf. By bending each tooth out half a tooth thickness, you make a kerf that is twice as wide as the blade is thick. Thus we don’t set a saw just to impress the neighbours, but to make it easier to push.
As I said before, rip saws are filed across the blade. Each tooth acts as a tiny chisel, and chisels out a shaving. It is best used cutting with the grain, not across.
Rip saw teeth, being sharpened both sides, act as knives and sever the timber fibres. They always work best across the grain, when they can slice through the wood fibres. Rips are best used on ply and Masonite.
Sharpening saws should be both easy and quick. The first few may take a bit more time, but with practice comes skill. I see no point in spending $6 to have a saw done professionally, when I can buy a saw file for less than $2. (Early ‘80s pricing. These days finding anyone who can sharpen your saw professionally is a neat trick!)
