When we built the back deck we did not include a gutter on the end of the roofing, so the water just drips off onto the lawn, or the dirt as the case may be. This has proved to be unsatisfactory because the drips are wearing a ditch into that part of the yard and it is contributing to flooding parts of the backyard during heavy rain. Some of this water can flow into the neighbours, which although it doesn’t upset them, it does mean rainwater lost to our system.

To get around this I proposed to Linda about digging down a bit and putting some gravel in so that the water would not overflow, but soak in and not be lost. With typical commonsense she suggested extending the soak area at each end and widening it so we could also use it as a path from the back step to the door of the garage. So it became a multipurpose path, which works for me!
To install the path/drain I did the following –
- First I marked out the extent of the area to be dug. Fortunately we have had a bit of rain and it is winter, so our essentially clay soil is still fairly soft and diggable. I marked out the extent of the path by using the spade to cut down a few centimetres forming a line which I could follow.
- After marking the area out, I went through with my mattock quite shallowly and removed the surface grass in the area to be dug and carted it away to be composted.
- Then the main dig commenced! To be able to hold the volume of rainwater required, I wanted to dig down to around 15cm, again for the most part this was easy because of the state of the ground, but closer to the deck had been sheltered from the rain and was quite hard and dry in places.
- Then came the surprise. Running along the area close to the deck and at a slight angle to it, I encountered and obstruction. As little as 5cm below the soil surface, unknown by me, was the terracotta pipe sewage line! Fortunately I was using the spade ant not the mattock – otherwise, mass unpleasantness! Once I knew it was there is was relatively easy to uncover it without damage, but it just goes to show, you never know!
- To dig out all of the spoil took me almost a week, working on and off and fairly early on I ran out of places to dump it in our yard. I noticed that one of the neighbours had some holes in their yard and a bit of a retaining wall and when I approached them they were happy to take the barrowloads clay and soil I was digging up.
- With the soil dug out, I got hold of some timber and used it to line the outside of the trench, keeping them in place with 450mm star pickets, making sure not to hit the sewer line while driving them in. I then lined the bottom of the trench with drain matting to reduce the chance of the gravel mixing with the soil beneath the trench.
- To fill the trench I used 10mm blue metal gravel. My preferred material would have been crushed, recycled terracotta tiles and bricks, but when I made enquiries I was told the place that made it had gone bust so gravel it was!
- I measured up the trench and calculated I needed 0.8m3, but had to order 1m3 (or 1.5Tonnes). The calculation was pretty rough but in the end must have been close as I still had some gravel over when the trench was filled. Starting at one end and filling it in meant I needed to put some particle board down or the wheelbarrow, which was quite heavy with gravel, would dig in too much.
- Once the gravel as in it was just a case of using a rake to smooth off and flatten the surface.
So we now have a dual purpose path/drainage trench and from the rain we have had it seems to work well, but I waiting for a big rain to see how it performs then!


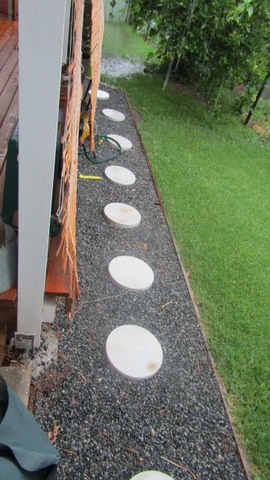
December 2018 Update
We have had a number of fairly severe rain events this December and the permeable path has performed remarkably well, accepting all run off from the back deck without overflow. The photo below was taken towards the end of the latest downpour. The water at the top end of the photo has run back from the drain point of the tanks.