In another article on this site there is a plan for a crude set-up that could be used to dry food using the sun’s rays (and incidentally raise seedlings if required). It worked, but because the food was exposed to the sun directly, there was a loss of nutrients and in some cases colour/texture, eg the onions went brown. As priorities changed the set up was discarded and I now have a full size “plastic” house (well I can’t exactly call it a glass house can I?), but this did not help me with preserving the harvest.
For some time I have been interested in food preservation and tried pickling, bottling, smoking etc. but was not really happy with the results, the flavours were not really to my liking. I found the commercially dried products and home produced ones to be palatable, although some commercially dried materials contain sulphites as preservatives. I therefore decided that I wanted to use drying as my major means of home food preservation. I still wanted to use the sun as my power source but rather than use the direct rays I wanted to use the sun to heat the air and then use the hot air to dry the food. It was time to do some research.
My library is a reasonable one but most of the designs for solar driers that I had were the direct rather than indirect type, with one exception – “Reclaim Recycle Reuse” by Alan B. Hayes published by Sally Milner Publishing (My copy 1982) – which gave a good diagram of an indirect solar drier. I wanted more information and put a query on the Internet and found an Article out of the American magazine Home Power #57 (Feb/Mar 1997) called “Design, Construction and Use of and Indirect, Through-Pass Solar Food Drier”. The article was very technical and in depth (I saw it reproduced on a number of solar cooking sites so just put “Solar Food Drier” into your search engine) and gave detailed plans for a high efficiency unit 7 foot long by 6 foot high. For me this was overkill in the extreme so I used it as the basis for mine and sacrificed “efficiency” for manageability. I figured that in Sydney with our abundance of hot sun (especially in Summer) I could de-tune it a bit and it would still do what I wanted it to.
My main criteria for design were that the drier should –
- Be not too expensive
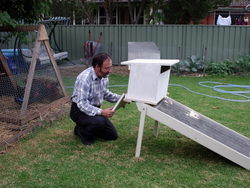
- Be manageable by one person
- Dismantle for storage
- Actually dry the food!
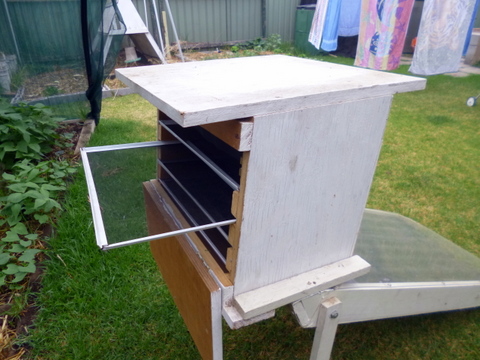
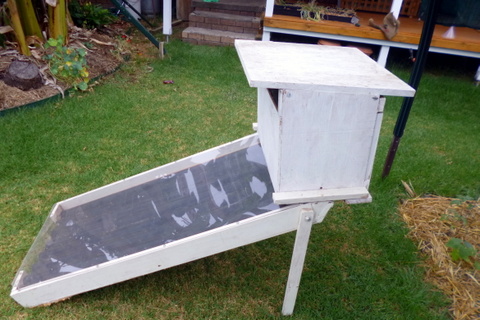
The drier was designed in two modules, the solar collector and the drier cabinet itself, these could be separated to store the drier so that I did not clog up my already severely constipated garage/workshop even more.
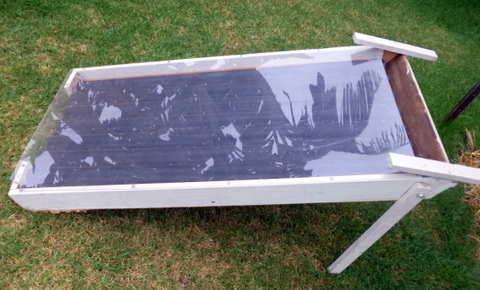
The Solar Collector
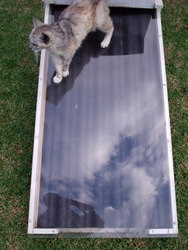
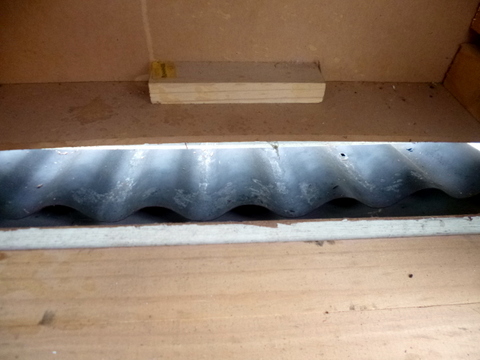
I am a simple man, as I am sure that any of my family or friends reading this will agree, and so I did not get involved in any arcane calculations when working out the size of the collector, it was based around the size of the glazing material. I used a 1200mm x 600mm sheet of Laserlite® Handipanel which was available, light, robust and easily worked but at $40.00 it was the most expensive single piece of the drier. The backing was likewise a 1200mm x 600mm sheet of 6mm medium density fibreboard (MDF), and to form the sides connecting the two I used 90mm x 19mm pine. After I screwed the sides onto the base and I then screwed in three one metre lengths of 42mm x 19mm pine, one on each side and one roughly in the middle. This is to support the absorber plate so that air on both sides of the plate will be heated. I also put in two 90mm x 19mm x 100mm pieces of pine in the air intake area to support the end of the glazing material. I cut the absorber plate to fit the inside of the collector from a standard sheet of that wonderful, all purpose material – corrugated iron.
Before I installed the absorber I gave it two coats of matt black paint with a spray can, it was solvent based so I put the finished plate out in the sun for a couple of days to make sure that all of the solvent had evaporated. I didn’t want to get my healthy, organically grown vegies contaminated by solvent materials. It would be possible to use soot or other blacking material but the paint was quick and easy, time is of the essence these days. The collector then got a coat of primer inside and out, and I drilled outsized holes in the glazing material and used self tapping screws to attach the glazing material to the collector once the absorber plate was installed. When I first used the set up, a trap for young players was revealed – the glazing material expanded in the sun, causing some bowing and air gaps between the mounting screws. The best thing would be to widen the holes into slots to allow for some lateral movement as the absorber heats up.
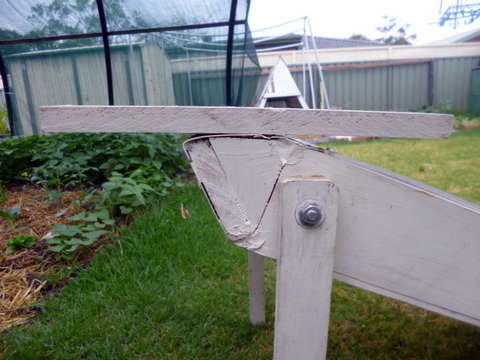
So that the absorber is on an incline, which improves airflow and heat absorption, I installed a leg each side of the absorber. These were made out of 45mm x 90mm pine that was 580mm long and were attached by 6mm bolts so that they would swing back in line with the absorber when it was stood up, making for easier storage.
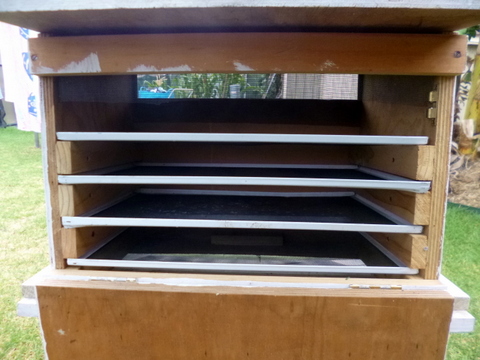
The Drier Cabinet
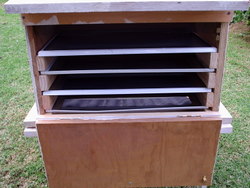
How big to make the drier cabinet? I did some research on the cost of trays, these are usually made to order from flywire and fly screen surround. To get all the gear to make up four reasonable size trays was $60-$80, a bit of slug, so I kept looking. In my local hardware (Bunnings) there was available a set of two readymade screens that were held together by two pressed steel rails, designed to go into the old wooden casement window as an expandable fly screen. They were all metal and while it wouldn’t be a good idea to use them for a trampoline, they were robust enough to carry a good load of fruit or vegetables for drying, and even better, they were about $12 a pair. Also at 295mm x 475mm they looked about the right size, so I designed the drier cabinet around them.
For the drier case I had some old 20mm thick plywood lying around, so that’s what I used for the top, sides and back door, the rest was constructed of 6mm MDF. The top of the cabinet slopes up toward the front, both to shed rain and to direct the escaping hot air to the front of the unit, where there is an 85mm high, full width gap. Not being a total fool I screened this gap to prevent access to flies and other insects, but at the back access flap there were some 5-6mm cracks that I did not think would be a problem. After the first use of the drier, I found flies in there, so now these are screened also (standard fibreglass fly screen material).
The back access flap where the drier screens are put in was also 20mm plywood and, because the unit may have to stand up to the rain, the hinges and catch were both made of brass to prevent corrosion. A wooden knob was also put on to pull the door open (funny about that!). I then screwed a strip of 6mm MDF and some 90mm wide pine onto the bottom of the cabinet so that there was only an opening wide enough for the hot air coming out of the absorber to fit in.
The only thing left to do was then mount the cabinet on the absorber unit. After some considerable thought I screwed a 45mm x 19mm rail on each side of the outlet of the absorber, which worked out to be the right width for the cabinet. The cabinet now slides between the two rails until the gap in the bottom lines up with the air outlet on the absorber.
So, how does it work?
Very nicely thank you! Here in Sydney the weather has not been as hot as usual for this time of year (Jan 2002) and in full sun the cabinet gets up to a temperature of 55°C to 60°C by mid afternoon, the morning temperature being about 45°C to 50°C. This has proved very effective in drying vegetables and so far I have successfully dried – carrots; corn kernels; cauliflower; cabbage; onion; potato; tomato; zucchini; mushrooms and some pre-cooked rice. The “aroma” of the cauliflower and the cabbage have been concentrated considerably and the cauliflower has gone brownish but everything tastes OK. There are lots of other things that can be dried this way including fruits, fruit leathers, soups and made dishes as well as jerky and biltong etc.
More information
While there is a considerable amount of information about drying food on the Internet, I did find an Australian book that covers the subject well, it is called simply “Drying Food” by Ricky M. Gribling (Hyland House, 112 pages, 1997). While I disagree with the authors’ comments at the start that the only way to dry food is to use an electric dehydrator (everywhere else is too polluted), the book is quite comprehensive and has many good ideas. Another book that I have found to be handy (although it is American and based on electric dehydrators as well) is– Mary Bell’s Complete Dehydrator Cookbook, William Morrow & Co 1994 - it gives a huge amount of detail (280 pages).
2016 Update
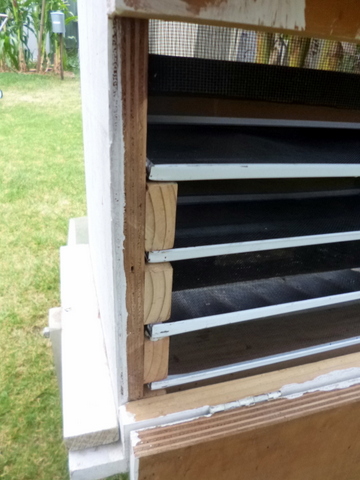
I had intended to put together a set of plans to make it easier to construct one of these babies, but is proving to be more difficult and time consuming than I thought (I can barely draw a straight line). It is still on my list of things I want to do, but it may be a while yet. In the meantime, here are some more detailed photos for those interested.
The solar heat collector