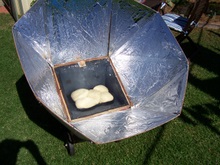
There is an article of mine on making a box solar oven here and in that article I expressed doubt that it would be capable of baking bread in winter. Well, I proved myself wrong and very happily so! I have developed a bread recipe that can be used as sourdough or conventional yeast and bakes to a turn in the solar box oven, even in mid winter even though it takes a bit longer.
Sourdough Starter
This process cheats a little bit in that it starts off with dry yeast rather than letting a flour and water mix sour naturally, but it works reproducibly.
3 tablespoons of instant mashed potato flakes (Deb or equivalent) or mashed potato
3 tablespoons of white sugar
1 cup of warm water (50% hot water 50% cold water)
1 packet of dry yeast
Combine the potatoes sugar water and yeast in a covered container, I used a 1 litre round Tupperware container which worked pretty well for me. Let is sit in the kitchen, somewhere out of the way for 5 days and be sure to stir it daily with a wooden spoon. On the morning of the fifth day feed the starter with 3 tablespoons of potatoes, 3 tablespoons of sugar and a cup of warm water. In the evening take out 1 cup of starter to make the bread with and refrigerate the remaining starter.
Feeding the Starter
Keep the starter covered but not sealed in the refrigerator and feed it once a week using – ¾ cup of sugar, 1 cup of warm water and ¼ cup potato (mashed or flakes) and leave it uncovered in the kitchen for 8 to 12 hours. If you are not going to make bread, remove a cup from the starter and give away or add to your composter.
Making the Bread
Mix the following components in a large bowl –
3 cups of organic plain flour
3 cups of organic stone ground whole meal plain flour (or any mix of flours you like)
½ cup sugar
1 tablespoon of salt
½ cup oil (I use olive oil but whatever works for you)
1 cup of starter (Replace with 2 teaspoons of yeast if no starter)
1 ½ cups of warm water.
Mix everything with a wooden spoon and then let it raise for about an hour. Then turn the dough out onto a floured surface, I use a marble slab (an el cheapo $10 one) and knead for 5 minutes or so. Have extra flour on hand for dusting the surface and your hands, as the dough will get quite sticky!
Once kneaded, place the dough into an oiled bread tin and leave overnight to rise.
This recipe makes the right amount to fill a bread tin 280mm long x 110mm long x 100m wide (at the bottom), so you may need to vary things a bit depending on your bread tin, If you are going to make the bread in a solar oven the base of the tin should be as flat as possible (not stippled) and be painted black on the outside for maximum solar heat gain. Place the tin in the oven so that one of the long sides is facing the sun, this also helps the cooking process.
The bread will cook well in the solar oven, but I don’t time it I just keep and eye on the colour of the crust and once it goes sufficiently brown I take it out. Part way through the cooking, say 20 to 30 minutes after going in the oven turn the bread so that the other long side is facing the sun to ensure an even cook.
Remove the bread form the bread tin and place on a cooling rack covered by a tea towel.
If you want to make bread NOW and don’t have time to wait, the recipe works well with dry yeast, just add 1 packet (or two teaspoons) of dry yeast with the dry ingredients and add 2 cups of warm water instead of 1½ and the starter.
I have found this recipe to give a good result at all times of the year, I have been making it for over 5 years now, although it will take a bit longer to cook in winter.
Happy Solar Baking!
Update Oct 2010: While this is a good bread the original recipe came from the US and they like their bread a bit sweeter than we do generally so you may wish to reduce the sugar to 1/4 of a cup, it will still rise OK particularly with the dry yeast. Another inclusion could be two teaspoons of bread improver to make it a bit less crumbly and better for sandwiches. Also if you are using dry yeast it is not necessary to leave the loaf overnight, it should be risen enough to cook after a couple of hours.


