Next to a forge the most important blacksmithing tool is an anvil. A true anvil can be very expensive and difficult to acquire, there are modern ones from overseas but these tend to made of inferior steel and the horn or beak is very thick to give it enough strength. This reduces its usefulness for blacksmithing. It is possible to make your own out of railway line though, and here’s how –
As in the recipe for tiger soup, the first part may be the hardest (first catch your tiger – or railway line). Since the department of transport takes a dim view of the destruction of functioning railways property, it is best to try scrap metal yards, steel merchants or maybe a local farmer who might have some lying around on his property (they used to use railway line to make cattle grids). Railway line can be found in the strangest of places, so start looking!
Now, assuming you have a supply of railway line, the next step is to cut it to length using either a power hacksaw or oxyacetylene set. How long you make it is a matter of personal preference but allow for the cut away beneath the horn and the heel of the anvil. The rough cutting to shape could be done with a hack saw, but I would hate to try it! Again, oxyacetylene is the way to go, it does a much quicker, if rougher, job. So the piece you are going to use can be cut off from the parent rail and the area under the horn and heel of the anvil can all be cut away with the oxy.
Once the anvil is roughly to shape the slag and rough edges must be cut back to a finer finish, this could be done with a series of files starting with coarse and moving to fine, but an angle grinder is much quicker, if slightly rougher.
The horn must be trimmed back more closely to a point and all of the slag and uneven edges left by the cutting removed. The slag is best removed with a cold chisel and fire brush. Depending on how rough the oxy work is, the trimming can take a while, even if you do use an angle grinder. It took me three hours to get to the point where it could be filed. For filing I used a 25cm half round bastard file (a 30cm one would have been better – a longer cutting stroke) and for final finishing, “wet and dry” emery paper and a wire wheel attached to the angle grinder to remove the rust from the as yet untouched surfaces.
Back when I was making the original anvil I had access to a metal milling machine, I was able to mill the sides and top to get a very flat finish, resulting in a better finish for the stuff that I was making.
There was quite a lot of physical labour involved, but a minimum of cost apart from acquiring the railway line and getting access to the oxyacetylene equipment for the rough cutting. My anvil cost me nothing but time.
Apart from its cheapness, railway line has other features to recommend it for anvil manufacture –
• The steel is tough without being too hard to work.
• There is a large flat base, which makes the anvil steady, also if the setup is so designed the anvil can be turned upside down and the flat base used to work on.
• Railway line is not symmetrical in section. The rail has one sharply angled side and the other has a more gentle radius allowing versatility in bending angles.
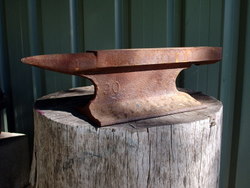
Once you have got this far, the anvil can be mounted on a wooden stump to absorb the shock of the hammer blows. According to the experts, the anvil should be mounted at such a height that you can touch the top face with your finger tips without bending over.