


While reading and old book on sheet metal work, (How to Work Sheet Metal by H.J. Dyer, first published over 50 years ago), I came across a bench modification for folding sheet metal. The idea is simple, based on a piece of angle iron, let into a bench and a length of flat steel strip bolted to it. I made mine on a much smaller scale that the one recommended, but I only used materials that I had on hand, and it works well for me.
Construction details
The first thing to do is work out the size that you want. It may be anything up to the full length of the bench. Mine is only 2/3 as long as the bench or 850mm (33in). Once your angle iron and steel strap cut to length the angle iron needs to be let or recessed into the bench.
I used 25mm x 25mm (1 x 1 in) angle iron about 6mm (1/4 in) thick, so I did not need to remove a lot of wood. A power router would be the quickest, neatest way to remove wood from the bench. I don’t have one so I used a mallet and a 25mm (1 in) firmer chisel. I may be basically destructive but I found it good therapy pounding away with the hammer and chisel. Also, my bench is pine and not too heavy going.
Once the angle iron site flush with the top and front of the bench it can be secured with wood screws. I drilled 3 holes for each screw, the first was a pilot hole through the angle iron and wood large enough to allow the screw to bite. The second (on the same axis) just through the iron to allow the shank to pass. I then topped it off with a large drill to give enough countersink so the screw heads would sit flush. This is especially important on the front of the bench.
I used 25mm x 8 gauge wood screws on the top (5 off) and 50mm x 8 gauge wood screws (6 off) on the front face.
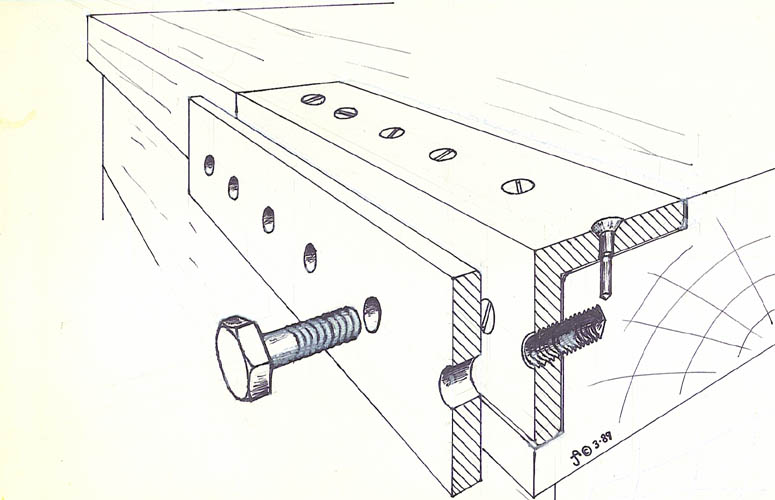
The angle iron is now secured and sitting flush with the bench and it is time to drill clearance holes in the steel strap and tapping holes in the angle iron. (for the front piece I used 37mm x 6mm steel strap).
The next decision is what size bolts to use. You need to have a few (I used 10) the same size, and a tap the right size to thread the holes with. I used 5/16″ Whitworth bolts (18 threads per inch) because I have a stock of them and as luck would have it, also a tap that size.
After marking out the steel strap and putting a centre punch mark where the holes were to be drilled, I clamped the strap onto the angle iron in the position it was to occupy when it was finished. I then drilled pilot holes through the strap and the angle iron (3mm diameter) so any subsequent enlargements would line up.
Removing the steel strap I drilled the clearance holes in it to allow the bolts to pass through without binding. This happened to 8 mm diameter. A drill press helps here to ensure that the holes are at 90° to the face of the iron, although it is not essential.
I then ran into technical difficulties when I cam to drill the angle iron for tapping . According to the chart that I have for such things, the correct drill size for a 5/16″ Whitworth tap is size “F” (what the hell?). Not having one (or even being sure where I could GET one!) I had to use the closest I had which was 17/64″ diameter (slightly oversize). The finished hole when threaded is a bit loose but OK. So could then finish tapping out all the holes. I do not come from an engineering background and tapping threads into holes in metal is somehow satisfying to accomplish, maybe it’s just me! It is quite simple to do but a bit difficult to describe, and competent fitter/machinist/ boilermaker can show you how.
All that is required then is to bolt it together and see if it fits. The left hand end bolt was binding a bit, but drilling out the hole in the strap to the next size up fixed the problem.
You use the folder by removing enough bolts to allow the metal you wish to bend down to fit between the angle iron and the strap. The remaining bolts are then tightened up and the metal bent over using your hands, a lump of timber used as a former, or judicious application of a “gentle persuader” (hammer).
It took me five hours to put together. The only specialized bit being the tapping of the holes, which is dean easy when you have the right gear. I have folded sheet steel up to 1mm thick in this machine with little problem.
Just recently, I made up a reflector oven to go in front of our open fire using the folder and it performed flawlessly. (the oven was used to cook up a chook to perfection!). It is one of those tools that enables you to do work that otherwise would be very difficult or impossible without access to a metalworking shop.
Happy folding!
Materials and sizes
Angle Iron
I used: 25mm x 25mm
Recommended by the book: 2 ½” x 2 ½”
Steel strap
I used: 37mm x 6mm
Recommended by the book: 2 ½” x ½”
Wood Screws
I used: 25mm x or 50mm x 8 gauge
Recommended by the book: 2 ½” x ¼”
Bolts
I used: 5/16″ Whitworth
Recommended by the book: ½’ Whitworth.
