I have kept chooks for many years, and for the past few years I have bought point of lay Rhode Island Reds from a local poultry farm to replace those that have gone to a better place. We have had some recent chookacides and we’re down to one laying hen and one retiree, so replacements were due. Unfortunately, since the last set of replacements, that local poultry farm had closed down. This left me in a bit of a bind and after spending one Saturday afternoon trying to track down a producer of chooks I thought “bugger it! I’ll raise my own!” As usual, decisions taken in haste mean lots of fun down the track.
We have a pet shop near us that keeps baby chicks as food for reptiles etc. so I figured that I could raise some of them up to laying size (and save them from being lizard poo). It has been almost 10 years since I brooded chooks (as part of the farm technology course) so I thought it was worth a try, but what on earth could I use as a brooder?
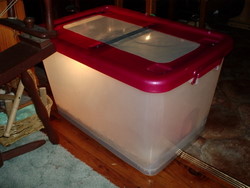
I remember reading somewhere(possibly on the internet) that someone had made a chook brooder out of one of those plastic boxes used to store clothes and other junk under beds or in wardrobes. So I went looking for one in the el cheapo shops that you find around nowadays (like the Warehouse etc.), to get the biggest one that I could find. This turned out to be 430mm high, by 450mm wide and 680mm long, which translates into roughly 120 litres. It was the last of the batch and had some bits off, so from an original price of $20, I talked them down to $16 (can I haggle or what!)When I got it home it looked huge, but as it turned out, bigger is better!
To prepare it for accommodation, I cut a large ventilation hole in the top 570mm long by 235mm wide, basically by cutting out a raised panel in the top. My initial thought was to do this with a Stanley knife, but this was tough plastic and after a couple of close calls on finger amputations and 20 minutes of sweating and swearing, I grabbed the jig saw! After drilling a hole big enough to accept the blade, it took just a matter of minutes to complete the hole and remove the panel. I then covered the hole with fly screen to screen out flies, cats and other annoying insects, supporting the wire by screwing some battens made of 20mm scrap plywood cut 35mm wide and long enough to bridge the gap.
The next trick was to provide some heat so the little things wouldn’t freeze to death as well as light for those all night chook parties. To achieve this I wired in a light using a recycled batten fitting and some old 3 core flex and plug so that the light was 250mm off the floor of the brooder. My original intention was to use a 40 watt bulb so as not to overheat the chicks but all we had was a 60 watt so I used that, but when we first got them they clustered below it so in the end I had to upgrade to a 75 watt anyway. I have since seen a design where the lighbulb is encased in a terracotta plant pot so that while it keeps the space heated it does not subject the poor little chickees to a continuous 3rd degree (besides, I know where they were on the night of May the 5th). When it comes time to use the brooder again, I will be fitting a pot over the bulb!
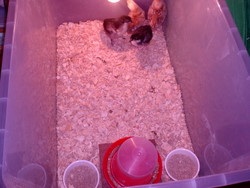
Once the structural work was done, I used a couple of ceramic ramekins to hold the feed and a commercial plastic waterer (OK, I wussed out and bought one, but it was 20% off on the ‘specials’ table!), then put newspaper and pine wood shavings in the bottom. The newspaper/shavings absorb their droppings and give them firm footing, the plastic being very slippery.
Now it was time for the chooks!
Unfortunately, on closer enquiry, the day old chicks for sale at the pet shop were a meat breed…………bugger! This then caused a wasted weekend while I raced hither and yon looking for day old Rhode Island Red chicks, but all to no avail. After a quick search on the internet, I found out that the chook producer had relocated, not closed down. DOH! However, I had gone this far so to save money and for the interest we picked up two day old Rhode Island Reds and two day old Australorps.
They were so tiny looking in that huge brooder, I thought that I could have made do with a smaller one, but boy, do they grow! According to the books, they need supplementary heat for the first five weeks, and they actually stayed in the brooder for six weeks, but by the end of that time I could actually hear them hatching plots to break out and they were getting pretty cramped.
While they were in the brooder, they were fed on commercial chick crumbles and I threw in some coarse sand when I changed their bedding, so that they could peck it and get into their crops to help grind up the food.
The chicks were raised during July and August in Sydney so the extra heat was needed to keep them warm even though they were in the lounge room for most of the time. The chicks are very cute but somewhat noisy. My son in law found that out one night when he was a bit crook and spent some time on the lounge. Towards the end of their time inside, they needed their litter changed every few days and my wife was mumbling dark threats about what would happen if they didn’t go outside soon.
At 6 weeks the chook tractor was finished and I could move them outside safely!