


As with all of the stuff I have written on this site, I practice what I preach and I made one of these many years ago, based on a design by Peter Pedals (Peter Van Der Wyk). It sat up on the roof of the garage for about 10 years and with all due respect to the great man, it didn't work very well for me. It may have been the way I interpreted his design but it was an eyesore, it was noisy, it generated about 1 amp at best and every week or two I had to climb up on the garage roof and untwist the power wire from around the support pole. It was, however, cheap and easy to construct. If you are still interested, here are the details, Good Luck! -
Starting off with the bit that makes the power , three alternatives are possible :-
1. The Bottle Shaped Alternator - These are the most common type and relatively cheap but they have a high resistance to turning so they require a strong wind to generate any power .
2. The Sturmey Archer "Dynohub" - In this system the hub of the bicycle wheel itself becomes the generator . They are very efficient but are difficult to get and very expensive .
3. The Sanyo "Dynapower" Roller Style Alternator - In this system the alternator is a small wheel which is mounted on the rear of the bike and is driven by the tread of the rear wheel . They have less resistance to turning than the bottle style of alternator and are cheaper and easier to work with than the Dynohub. Thus they are (you guessed it) the preferred option . It doesn't matter that the outside of the box says that they are only rated for 6 volts , the voltage rises with the speed of the alternator (trust me).
Once you have acquired your alternator(s) you need a bike frame complete with front forks and wheel , I picked up mine at the local tip .The gooseneck which supports the handlebars is not necessary and should be removed if it is
still there .
The next thing to do is to get hold of an oxyacetylene set and straighten the forks by heating them up and then applying leverage to straighten them out . Make sure that the bearings where the forks join onto the rest of the bike are OK. If in doubt , pick up a new set from a bicycle shop ,they are called the head set bearings . These bearings allow the
generator to pivot into the wind and so are very important , likewise the wheel bearings should also be checked and replaced if worn .
The forks are re-inserted through the headset in the opposite way to the way that they were originally . This allows the alternator to clear the rest of the frame so that the wheel is free to rotate through 360o . The alternator is attached to the forks by bolting it on through the hole where the front calliper brakes would have been attached . The alternator roller should touch the wheel during its full rotation, but only lightly to generate the least resistance to turning as possible .
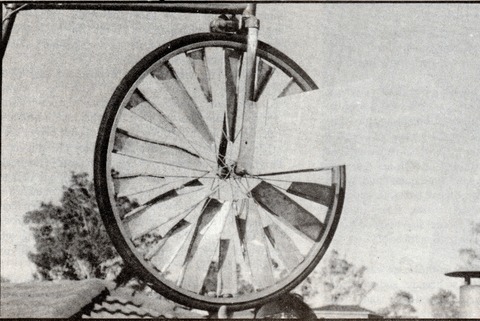
The wheel can now be made to catch the wind by bending light sheet metal across the spokes to form a fan . The lighter the sheet metal the better; it is easier to bend and less weight has to be turned to generate power . Once the vanes are attached to the wheel the tyre can be replaced , a tube is not necessary because the pressure of the alternator is minimal and the presence of the tube valve puts the wheel off balance . A vane is now attached to the forks at a right angle to the wheel , this allows the wheel to be turned back into wind when the wind changes direction . This can be pop riveted or screwed on using self tapping metal screws . When the wheel is placed into the forks the alternator is ready to wire up .
Only one wire runs out of the alternator setup ,the alternator being grounded through the bicycle frame . The single wire is taken up through the head set of the bicycle frame then along and down towards the batteries . This means that the wire will become twisted as the alternator turns around in response to wind shifts, so periodically it should be inspected and untwisted . A second wire to the batteries should be run from an earth screw secured to the bike frame thus completing the circuit .
The alternator setup can now be mounted , as high as possible , and away from obstacles such as trees , sheds or houses that are likely to interrupt the airflow. It should not be mounted directly to the house as vibrations are
transmitted through the mountings and in a high wind it can sound like your house is falling to bits!

Once it is mounted , both the alternator wire and the earth wire can be taken and wired up to the batteries . As mentioned earlier an alternator only produces alternating current and this needs to be rectified to direct current
before it can be stored in batteries. This can be accomplished by wiring a one amp full-wave bridge rectifier between the alternator and the batteries . A rectifier of this type is available ridiculously cheaply from electronics suppliers such as Dick Smith . The rectifier looks like a small black cylinder with four wires protruding from its base and four symbols printed on its top . The symbols are "-" and "+" and two wave symbols, the two wires from the alternator are connected to the wires directly beneath the wave symbols and then wires connected to the - and + are run to the negative and
positive terminals respectively of the battery . Once this is done all that is needed is some wind and the batteries will start to charge .
